![RPIC-Logo-Full-Color-MedRes-1.png]](https://hubsupport.rpic.com/hs-fs/hubfs/RPIC-Logo-Full-Color-MedRes-1.png?height=40&name=RPIC-Logo-Full-Color-MedRes-1.png)
Table of Contents
What the Customer Portal Does
Getting Access
Signing In
Submitting a New Ticket
The Tickets Page
Ticket Statuses
Reviewing a Ticket
Replying to a Ticket
Closing a Ticket
Email Still Works
FAQ
What the Customer Portal Does
The HubSpot Customer Portal is RPI's online home for your support tickets. It gives you a single, secure place to see every ticket for your organization, check where each one stands, read every conversation thread, add a reply or attachment, close a ticket that is finished, and submit a new one, all from your browser. Email still works exactly as it always has; the portal is a second window into the same tickets.
The portal lives at hubsupport.rpic.com/support-portal.
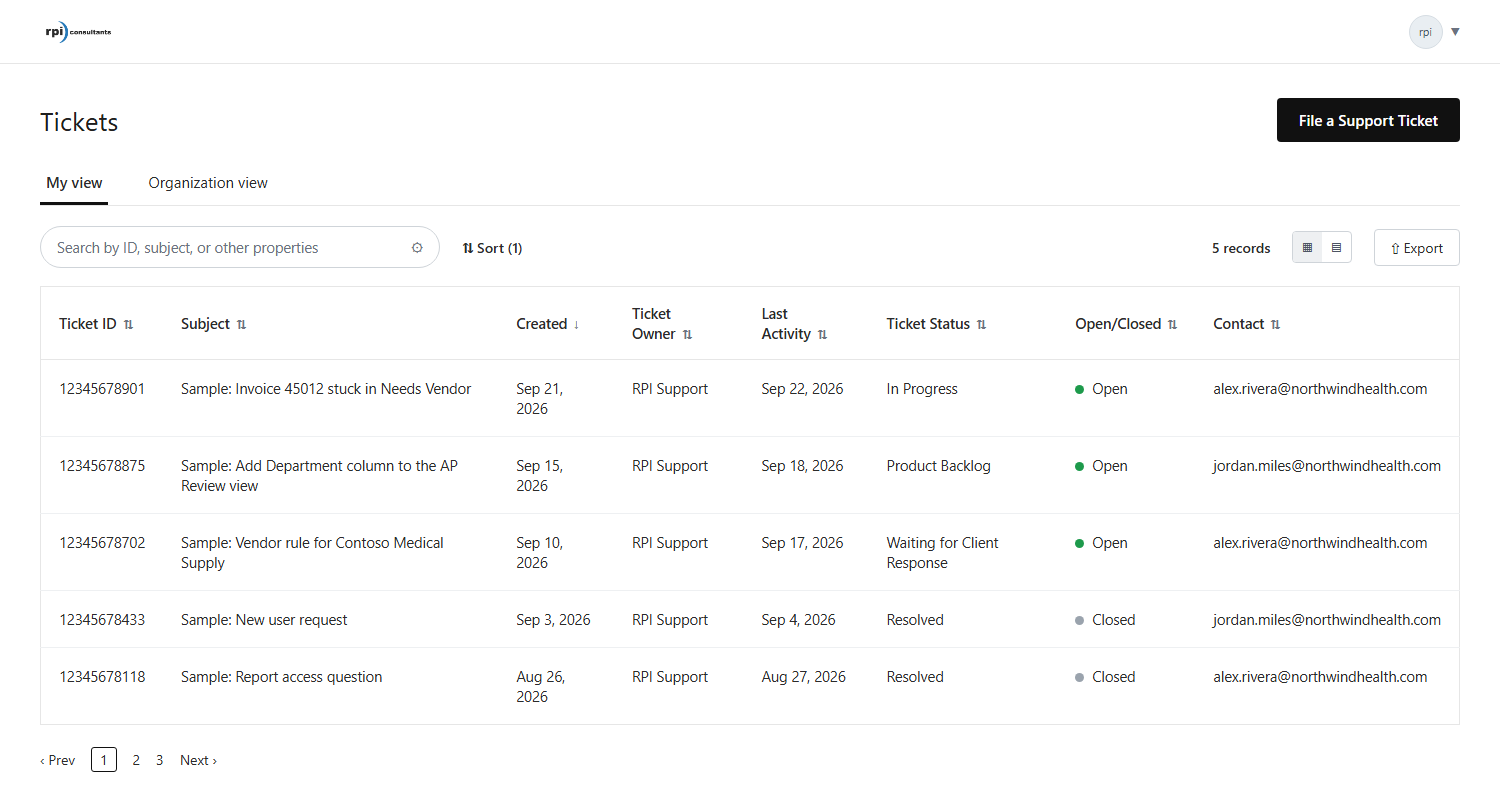
The Tickets page. Sample data shown.
Getting Access
Access is granted to designated users and administrators at your organization upon request. To request access for yourself or a colleague, reach out to your Service Delivery Manager. If you already have a portal login, you are all set.
1. Watch for the invitation email. You will receive an email from noreply@rpic.com with the subject Welcome to Service Hub! It says RPI Consultants has given you access. Click the Register in Service Hub button in that email. If you cannot find it, check your junk or quarantine folder for the sender noreply@rpic.com.
2. Set your password. The Welcome page shows your email address and asks you to choose and confirm a password. Use a mix of uppercase and lowercase letters, a number, and a symbol; the page shows the minimum length. Click Save password.
3. You are in. After saving your password you are signed in and taken straight to your tickets.
Note: If you were expecting an invitation and it has not arrived, let your Service Delivery Manager know. If the registration link has expired, use the Forgot password? link on the sign-in page to send yourself a fresh one.
Signing In
Go to hubsupport.rpic.com/support-portal, enter your email address and password, and click Sign in. Tick Remember me to stay signed in on that computer.
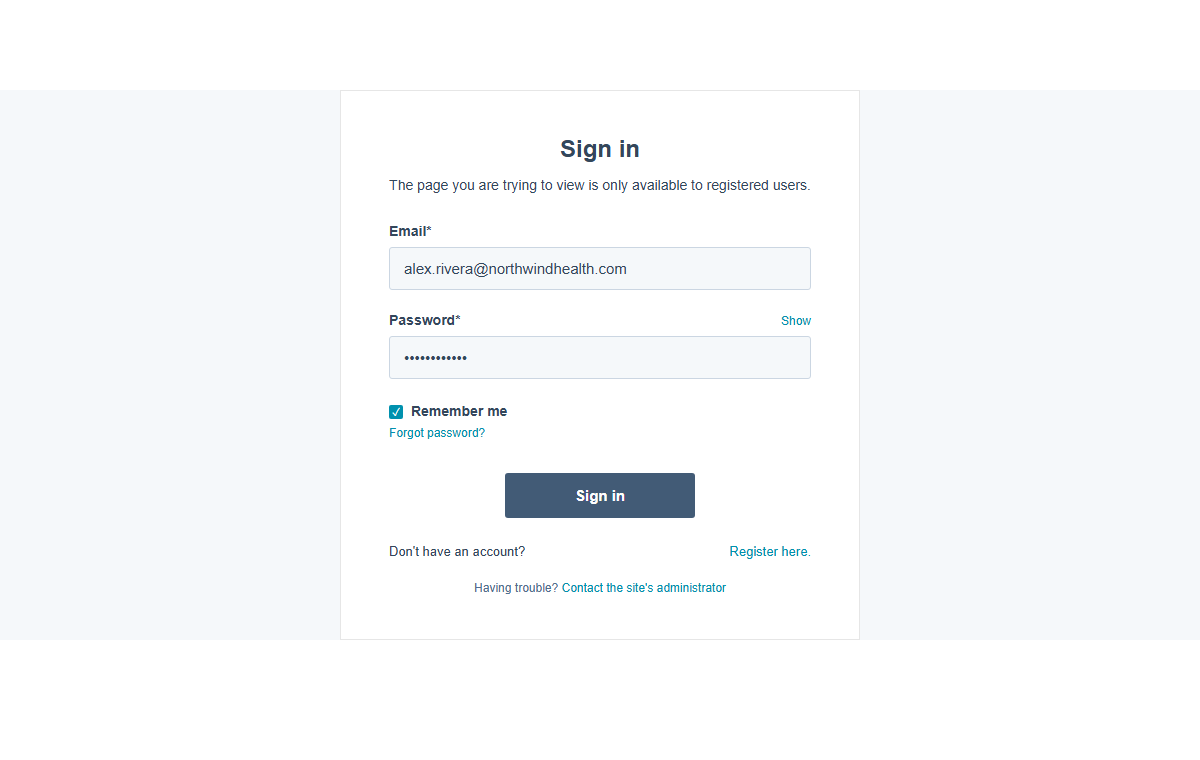
The sign-in page.
- Forgot password? sends a reset link to your email address.
- Register here is for people who have been invited but have not set a password yet.
Once you are in, the only navigation you need is the My Account icon at the top right of every portal page. Click it to open a small menu:
- Settings shows the profile RPI has on file for you: membership email, company, full name, job title, and phone.
- Sign Out ends your session.
Submitting a New Ticket
Click File a Support Ticket at the top right of the Tickets page. The form opens in a panel on the same page. Because you are signed in, the ticket is automatically linked to you and your organization, and it will appear in your list as soon as you submit it.
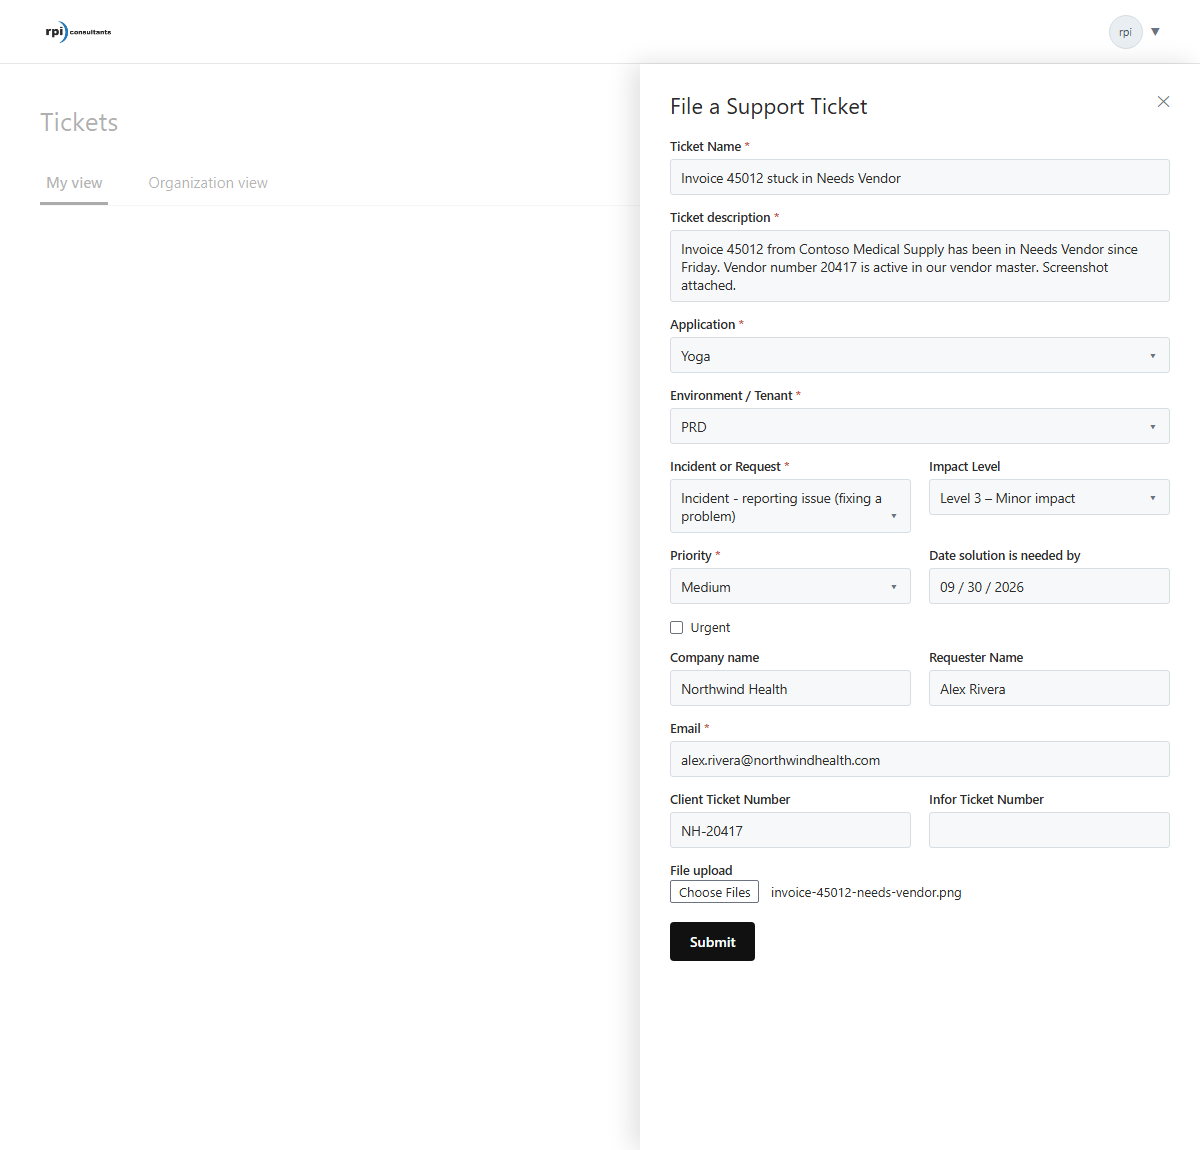
The File a Support Ticket form. Sample data shown.
The form is shared across all of RPI's support teams, so a few fields relate to other products. Here is how to fill it in for Infor. Fields marked with a red asterisk are required.
|
Field |
What to enter |
|
Ticket Name (required) |
A short subject line, for example "Invoice 123456 stuck in Needs Vendor". |
|
Ticket description (required) |
What happened, what you expected, and any document, vendor, or invoice numbers involved. |
|
Application (required) |
Choose Infor CloudSuite. |
|
Infor Application Area |
Select the application where the issue is occurring |
|
Environment / Tenant (required) |
Select the tenant where the issue is occurring |
|
Incident or Request (required) |
Incident for something that is not working, Request for new functionality, Inquiry for an information request. |
|
Impact Level |
How much of your process is affected, from Level 4 (informational) to Level 1 (system down). |
|
Priority (required) |
Low, Medium, or High. Priority and Impact Level together help the team triage. |
|
Date solution is needed by |
Optional. Add it when there is a real deadline, such as a month-end close. |
|
Urgent |
Select only for a production outage or a widespread issue. |
|
Company name and Requester Name |
Your organization and your name. |
|
Email (required) |
Pre-filled with your portal email address. |
|
Client Ticket Number |
Optional. Your own internal ticket or help desk number, if you track one. |
|
Infor Ticket Number |
If an Infor case exists for this issue, include that ticket number here. |
|
File upload |
Attach a screenshot, an export, or the document in question. |
Click Submit. You will receive the usual ticket confirmation email, and the ticket shows in your list with the status New.
The Tickets Page
The Tickets page is your home in the portal. It lists tickets in a table, newest first, with page controls at the bottom and a File a Support Ticket button at the top right.
Two views
Two tabs sit above the list:

- My view shows the tickets you opened or were added to.
- Organization view shows every ticket for your organization, whoever opened it.
Note: Organization view is intentional. It lets anyone on your team pick up where a colleague left off, and it is the quickest way to see everything your organization has open.
What the columns mean
|
Column |
What it shows |
|
Ticket ID |
The ticket number. Quote it when you call or email about the ticket. |
|
Subject |
The ticket name. Click the row to open the ticket. |
|
Created |
The date the ticket was opened. |
|
Ticket Owner |
The RPI team member working the ticket. |
|
Last Activity |
The most recent reply, note, or status change. |
|
Ticket Status |
Current status of the ticket |
|
Open/Closed |
A simple indicator: the ticket is still being worked, or it is finished. |
|
Contact |
The email address of the person on the ticket. |
Finding a ticket
- Search by ID, subject, or other ticket properties using the search box above the table. The Filter button inside the box narrows the list further, for example to open tickets only.
- Sort using the Sort control, or click the arrows in any column heading.
- Card View, next to the record count, switches the list from a table to cards. Click it again to return to the table.
- Export downloads the list you are looking at as a spreadsheet, which is handy for a monthly review or an internal status report.
Ticket Statuses
Every ticket is either Open or Closed. The Ticket Status column adds the detail: which step of the support process the ticket is in right now.
Open statuses
|
Status |
What it means |
|
Pending Support |
The ticket has been received and is waiting for the support team to review it. |
|
In Progress |
The support team is actively working the ticket. |
|
Waiting for Client Response |
We need something from you: an answer, an example, or a test result. The ticket pauses until we hear back. |
|
Waiting for Vendor |
Issue is waiting on a third party, such as Infor. |
|
On Hold |
Work relating to the ticket is on hold |
|
Pending Resolution |
Issue is believed to be resolved; pending your confirmation |
Closed statuses
|
Status |
What it means |
|
Resolved |
The issue was fixed or the request was completed and confirmed. |
Reviewing a Ticket
Click any row on the Tickets page to open the ticket. The ticket page has three panels.
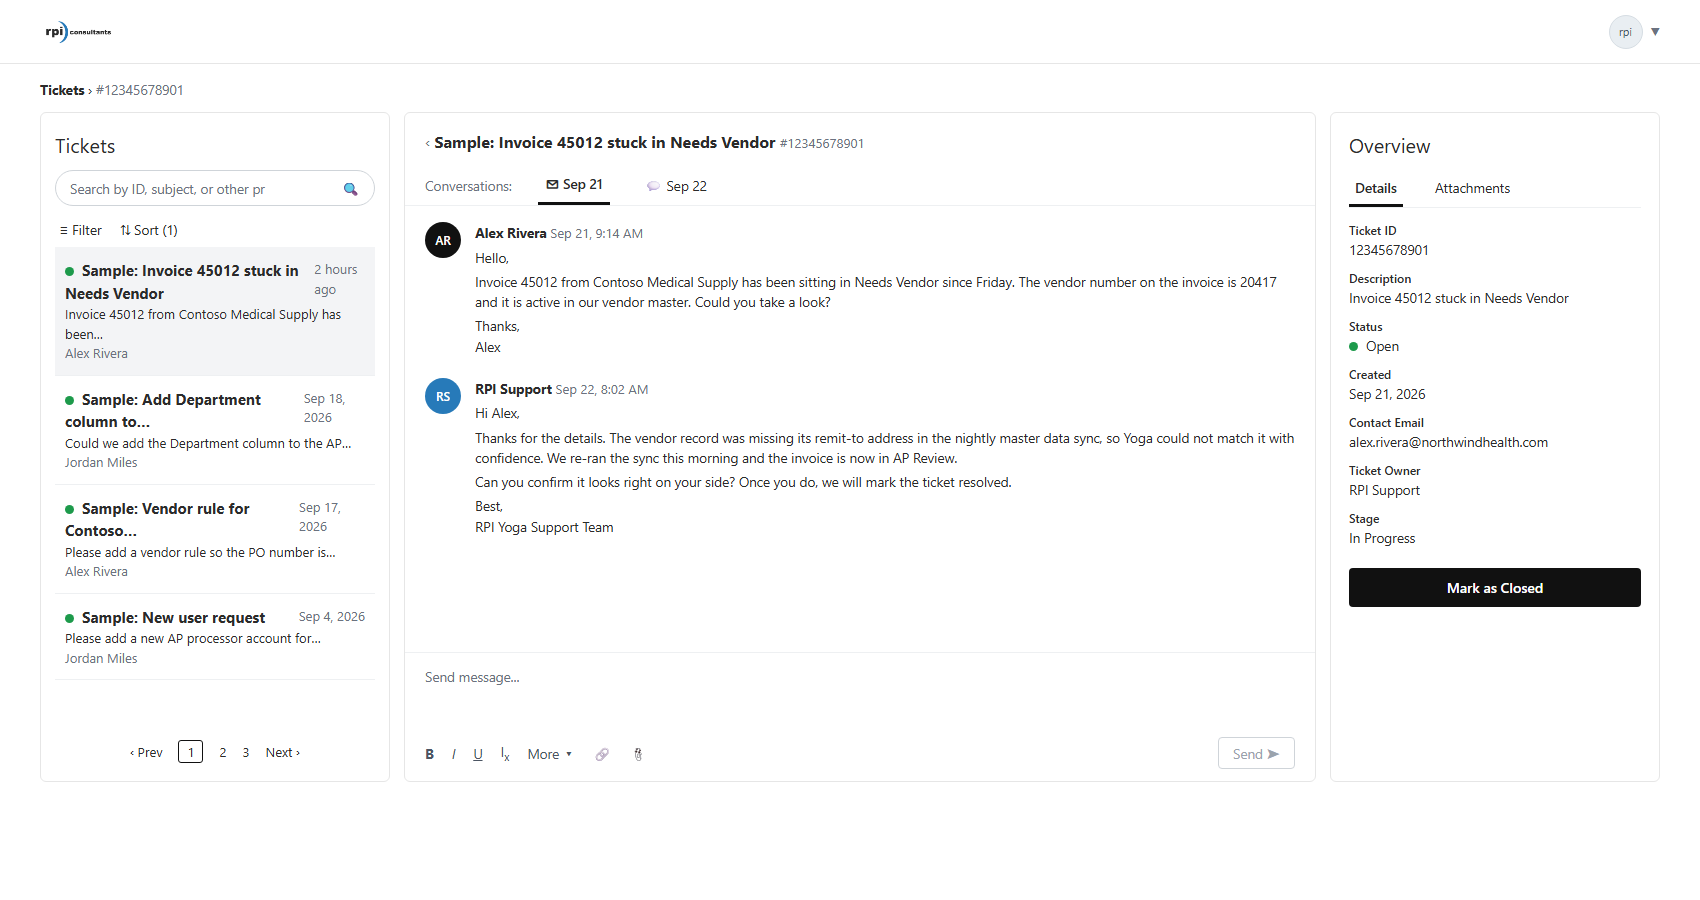
A ticket page. Sample data shown.
Left panel: your ticket list. The same list you came from, with its own search, filter, and sort, so you can move between tickets without going back. The small arrow at the panel's edge collapses it to give the conversation more room; click it again to expand.
Middle panel: the conversation. The ticket name and number sit at the top. Under them, the Conversations row shows a separate card for each thread tied to the ticket, for example the original email thread and a message sent from the portal, each labeled with its date. Click a card to read that thread in full.
Right panel: Overview. The Details tab lists the ticket ID, description, status, created date, contact email, ticket owner, and stage. The Attachments tab holds every file attached to the ticket. The Mark as Closed button sits under the details. This panel collapses the same way as the left one.
Keep the ticket number handy: it is the fastest way to reference the ticket in a call or an email. Use the back arrow next to the ticket name, or the Tickets link in the breadcrumb, to return to the list.
Replying to a Ticket
The message box at the bottom of the middle panel is where you reply.
- Click into the message box and type your reply.
- Use the toolbar under the box for Bold, Italic, Underline, and Insert Link (more formatting sits under More). Attach File, the paperclip, adds a screenshot, an export, or a document.
- Click Send.
Your reply is added to the ticket immediately, the support team is notified, and the same message goes out on the ticket's email thread so nobody misses it. Files you attach also appear under the Attachments tab in the right panel.
Tip: Screenshots and document numbers speed everything up. If you are reporting an issue with a specific invoice, include the invoice number, the vendor, and what you expected to happen.
Closing a Ticket
If a ticket is finished from your side, you can close it yourself. Open the ticket and click Mark as Closed in the right panel. The ticket moves to Resolved and shows as Closed in your list.
Once a ticket is closed, the portal no longer accepts new replies on it. If the same issue comes back, submit a new ticket and mention the original ticket number so the team can pick up the history.
Email Still Works
Nothing changes about emailing support. A message to support@rpic.com still creates a ticket, and a reply to any ticket email still lands on the ticket. The portal simply gives you a second window into the same tickets, with the added benefit of seeing everything your organization has open in one place.
When you reply by email, keep support@rpic.com on the message so the reply is logged to the ticket. Your email subject becomes the ticket name, so make it a short summary of the issue.
FAQ
Who at my organization can get a login?
Infor users authorized by your organization. To request a login, contact your Infor administrator; they can submit a support ticket asking for access.
Can I see tickets my colleagues submitted?
Yes. Click the Organization view tab to see every ticket for your organization. My view shows only the tickets you opened or were added to.
I don't see a ticket I know exists.
Check that you are on Organization view, then search by the ticket ID or subject. If the ticket was opened by someone at your organization who is not yet linked to your company in our system, email support@rpic.com with the ticket number and we will fix the link.
Why does a ticket show more than one card in the Conversations row?
Each card is a separate thread tied to the same ticket, for example the original email and a message sent from the portal. Click each card to read that thread.
Does replying in the portal reach the same people as replying by email?
Yes. Portal replies go to the RPI support team and to everyone on the ticket's email thread.
Can I reopen a closed ticket?
Not from the portal. Submit a new ticket and mention the original ticket number, or reply to the original ticket email.
I forgot my password.
Click Forgot password? on the sign-in page and follow the emailed link.
Is there a cost?
No. The portal is included with your RPI support.
Questions? Contact your Service Delivery Manager or email support@rpic.com.