The Yoga Intelligent Vendor Management tool empowers AP staff to serve as financial experts in the system. Intelligent Vendor Management improves invoice processing accuracy by automating extraction (creating rules) based on field changes conducted by the processors. The rules the system automatically learn are triggered by manual touches of 5 different invoices, on a vendor-by-vendor basis. For example, If 5 invoices from the same vendor have the same key touches to the same key field (i.e PO Number), and the system is able to learn where the value comes from, a rule will automatically enter pending state for review and approval. Additionally, users are able to manually create rules at any time! Key fields where automatic learning can take place include: Invoice Routing Categories/Codes, Company, Invoice Number, PO Number, GL Coding, Add-on Charges, etc. This tool can also assist with Vendor / Remit extraction by leveraging key invoice data like the Tax ID, Vendor Name, or address to ensure the system always populates the right vendor.
Key Benefits of Vendor Management:
- Increase Straight-Through Processing
- Continuous System Learning - per vendor
- Reduced Manual Data Entry
- Vendor-Specific Intelligence - changes only affect the vendor selected
- Better Data Quality / Consistency
- Faster AP Processing
**NOTE** Vendor management is not the place to edit your Vendor Master. Please utilize your ERP to make all key edits to vendor address, payment terms, etc.
Table of Contents
Navigation
To access Vendor Management in Yoga for FSM, navigate to the left-hand dark blue panel. After the reports and capture pages, select Vendor Management.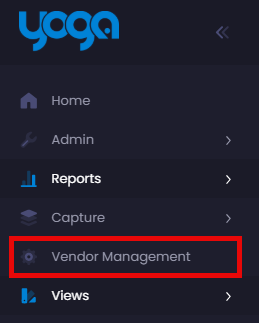
Once inside Vendor Management, the full list of your Active vendors in ERP are listed. These are sorted by Vendor Number, and then any separate vendor locations will appear in the Vendor Location column. Utilize the search bars at the top of each column and change between filter operators to find the vendor for review.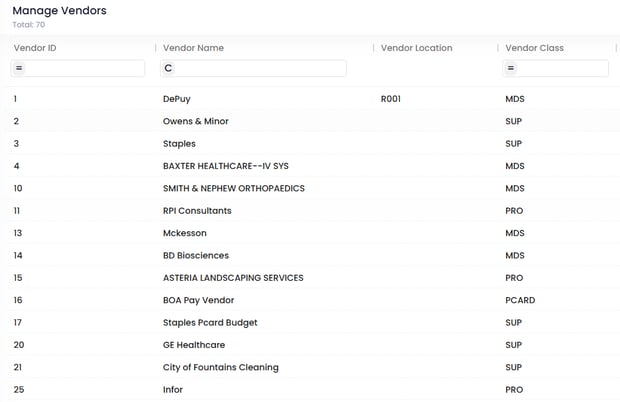
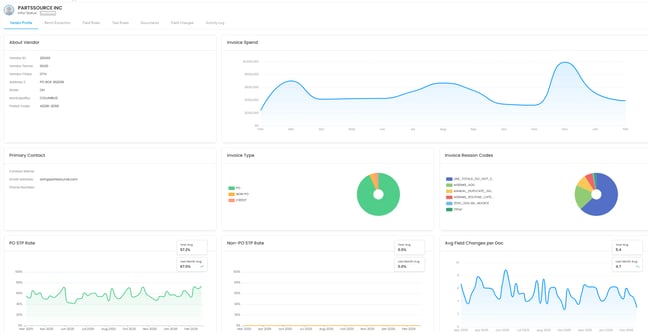
Vendor Profile
Select the respective Vendor Name to open the vendor profile. Upon opening the profile, the dashboard will show pertinant information from the ERP's vendor master, along with reports of processing for this vendor in the Yoga system.
-
The Invoice Spend report tracks the summed Invoice Amount for this vendor over time. Hover over each month's data point to see the sum and number of invoices for this vendor.
- The Invoice Type report shows the split invoice types for this vendor. This is key to knowing what kind of vendor rules to focus on creating for this vendor.
- The Invoice Reason Codes show the system-generated reason codes (populated from OCR) that are typically present on these vendors' invoices. For more information on reason codes, please review our Reason Code Guide.
- The PO and Non-PO STP reports will show the % of this vendor's invoices, by type, that can be extracted perfectly and flow straight through to the ERP for approvals, receipt matching, or payment.
- The Average Field Changes report shows the trends of field changes for this vendor over time. In this report, we want to see a downward trend, meaning the system has been able to learn new extraction rules or new rules have assisted us in decreasing manual touches.
Remit Extraction
Within the Remit Extraction tab, users can create rules to assist with Vendor or Vendor Location extraction. For some vendors, their invoices might not always be the cleanest for extraction. Yoga can utilize almost any field on a vendor's invoice to assist us in increasing the vendor extraction. Vendor extraction can be key for assigning out invoices to the team and ensuring the rules in the next section of this guide take place.
Once inside the Remit Extraction, Three tabs appear: Rules, Email Mappings, and Activity.
Rules - This is where users can go to create rules related to a value on the invoice to assist with Vendor or Vendor Location extraction
-
To create rules, navigate to the Rules tab within Remit Extraction.
- On the far right side of the page, select Add Extraction Rule. A list of invoices already assigned to that vendor number appears. To see a full system list of invoices, simply remove the vendor number filter.
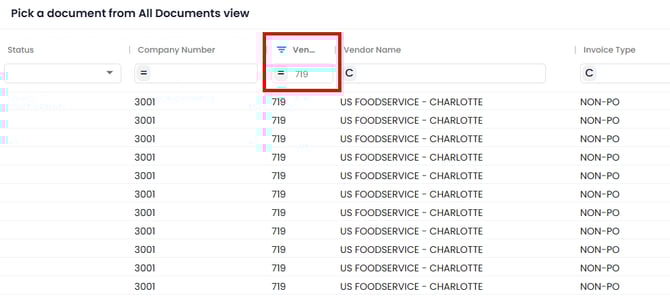
- Select a record to open.

- A pop-up window with an invoice image and extraction data is presented. Select inside the Add text from vendor document box and start keying values from the invoice or utilize the lasso tool (hold Ctrl + drag a box around the value) on the image. If you type a value in the box that is not found on the invoice sample, you will be presented with an error.
- Extraction rules search strings work on an all-or-none basis. If any strings are missing during extraction, this rule won't take place. You do still want to make sure that you add all key information that won't overlap with another vendor's invoice data. It is recommended to put the Vendor Name and Address if you can.
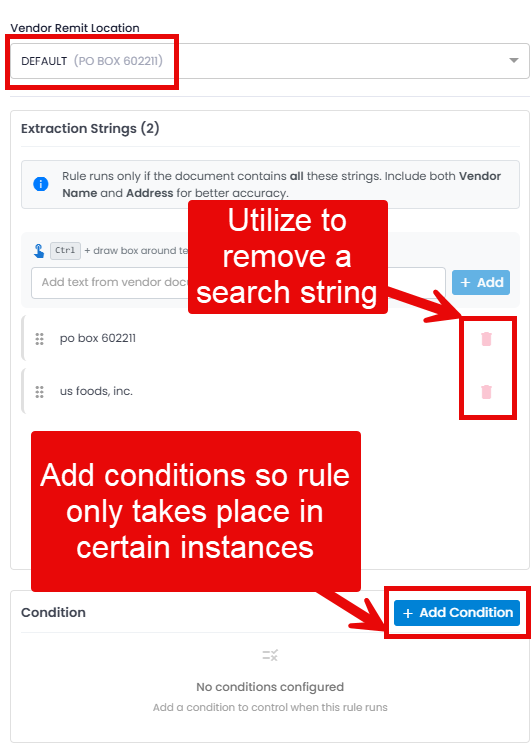
- Insert a condition if necessary (i.e., only for Non-PO invoices).
- Select Save.
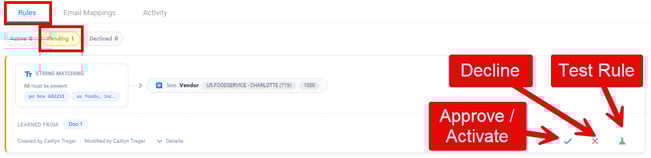
- You are taken back to the Pending tab in Rules. Once your rule is ready, select the check box on the rule to put it in an active state.
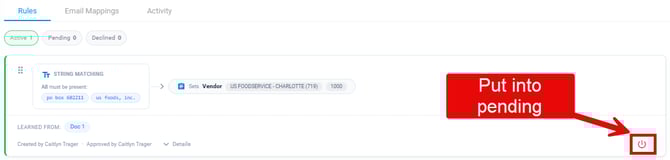
- To make edits or put the rule back into a pending state, simply select the power button at the end of the rules card.
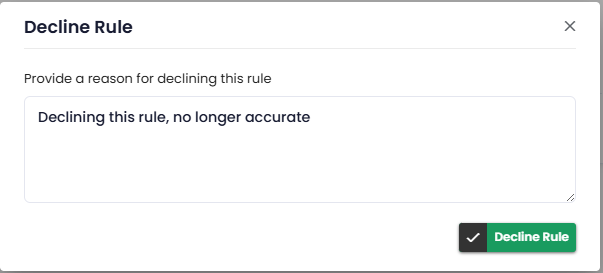
- If the rule is no longer applicable or doesn't apply anymore, from the pending tab, select the red x to decline the rule. You will then be prompted to input a decline reason. The rule should appear in the Declined tab.
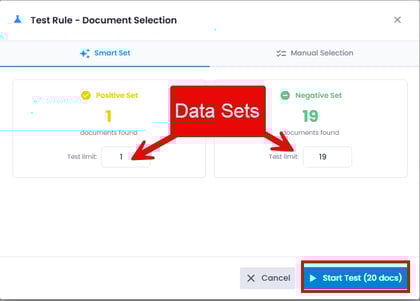
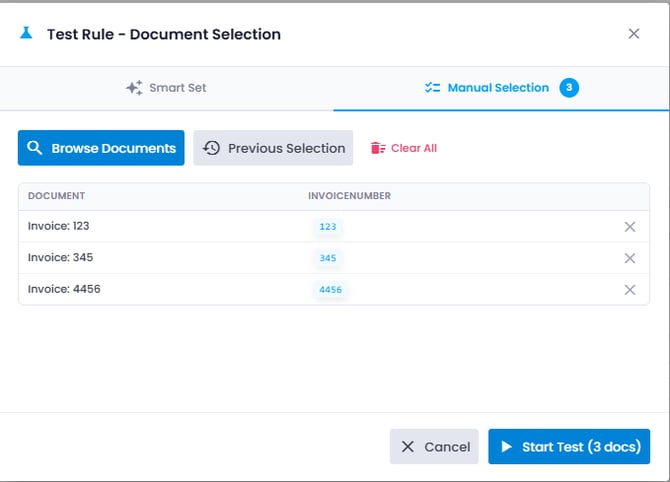
- To test a rule, select the test icon. A pop-up is presented. Run through one of the below options for testing. Once the set is selected, select Start Test (this could take a little bit to run).
- Smart Set - You will be asked to input your data set for positive and negative examples for the system to check. The recommended, if available, is 5-10 of each.
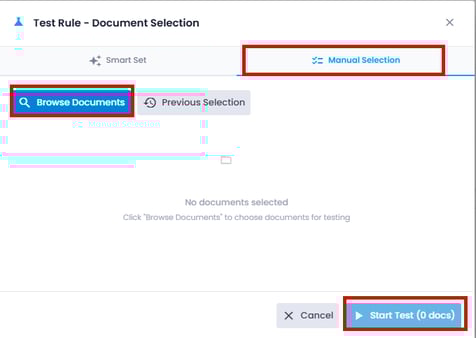
- Manual Selection - Select Browse Documents. A list of invoices for this vendor is presented. Manually select the documents you'd like to run the test on. If a set has been selected in the past, you can review the Previous Selection documents.
- Smart Set - You will be asked to input your data set for positive and negative examples for the system to check. The recommended, if available, is 5-10 of each.
Click here for a video of how to create a Remit Extraction Rule
Email Mappings - This is where users can go to create mappings based on the from email address an invoice comes in under to assist with vendor extraction. This should only be utilized for invoices coming into the AP Invoice mailbox directly from the vendor.
- In the Remit Extraction tab, select the Email Mappings tab.
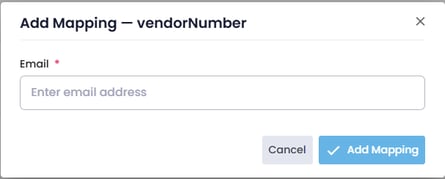
- On the far right-hand side of the screen, select Add.
- In the pop-up, you can add the email address that this vendor's invoices come into the AP Invoice mailbox from to assist with vendor extraction.
- Once added, you will see it presented in the list.
- To edit an email address after it's been added, simply hover over the email address and select Edit.
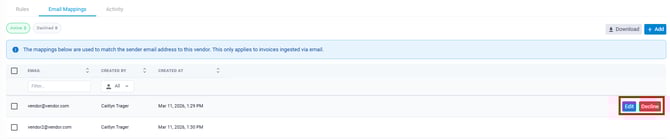
- To inactivate, hover over the row you'd like to disable.
- Select the Decline action on the right-hand side.
- If needing to remove multiple at once, utilize the checkboxes on the far left, then select the Decline Selected action.

Activity - Within the Remit Extraction tab, this is where users can go to track all updates for this specific vendor. Every time a rule or mapping is approved, created, modified, declined, or deleted, users can utilize this report to track who made the updates and when
- In the Remit Extraction tab, select the Activity tab.
- You are presented with all activities regarding Remit Extraction on this vendor.
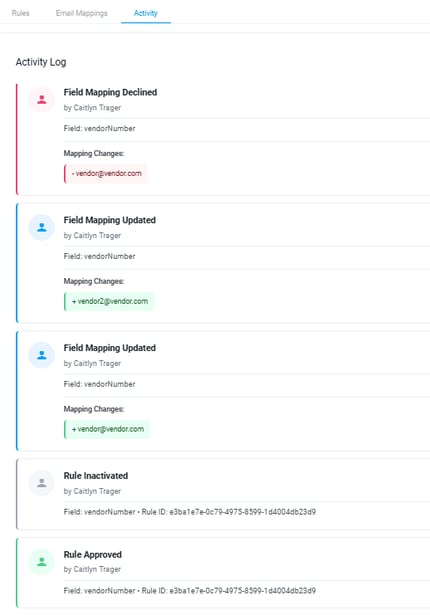
- On the far right-hand side of the page, you can adjust any of the filters to limit your search, such as:

- Activity Type
- User
- Date Range
- You also can export the data if you'd like to review further.
- By selecting an activity card, it will also take you directly to the rule update to review further.
Field Rules
Field rules are used to customize the extraction of a particular form value on a vendor-specific layer. Form values applicable for field rules can include: PO number in a description field, adding of add-on charges to be a single freight cost, unique utility invoice amounts, or default general ledger coding. Field rules allow for rules to take place in specific conditions (i.e Invoice Type is PO or Company is 10) and also can clean values to meet your specific processing requirements (i.e., for Amazon, keep the "-" in invoice number).
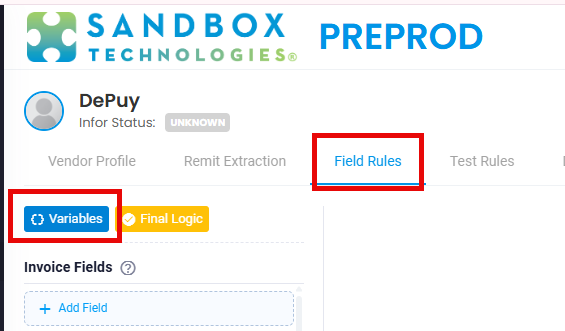
Select Vendor Management, then select a vendor you'd like to create an extraction rule for. Navigate to the Field Rules tab.
Once in the Field Rules tab, you can create rules. To create field rules on a field, navigate to the left side of the screen, under Invoice Fields, select Add Field. You will be provided with a full list of available fields on your AP form. Once found, simply select. Your field is added to the Invoice Fields list. If you field is already available below, you can simply select the field.

Below walks you through the different tabs available in field rules once your field is added.
Rules - Where rules are configured, created, and stored. Split into Active, Pending (being worked on), and Declined (inactive)
- Navigate to the Rules tab.
- You will be able to click through the three available rule tabs - Active, Pending, and Declined.
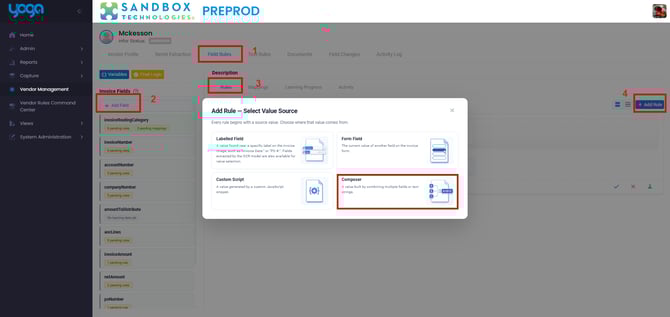
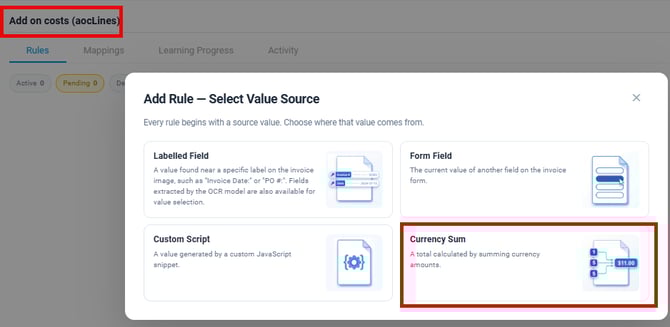
- To create a new rule, select Add Rule found on the right-hand side of the page.
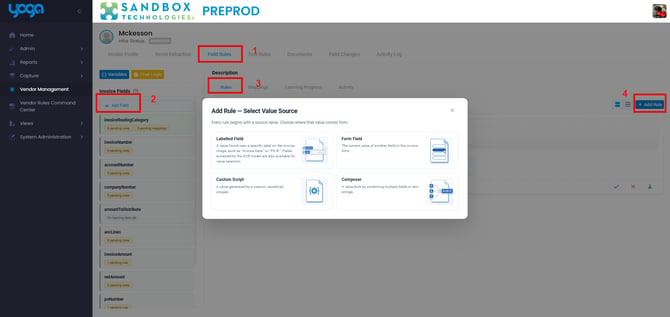
- Labeled Field - Utilize key labels on invoice samples to product your rule
- Reference ID = PO Number
- Form Field - Utilize another Yoga field to populate this field
- PO Number = Description field
- Custom Script - Available only to technical resources. Always for custom scripting in order to populate a field
- Composer - Merge multiple entities together using vendor variables.
- Account Number + Invoice Date = Invoice Number
- Currency Sum - Allow you to add multiple currency fields to 1 final field value
- Freight Charge + Handling = Total Freight
Create a Labelled Field rule
Labelled Field Rules allow you to map any labelled value directly from an invoice sample for your vendor to your rule. Model Fields are values typically found on a standard invoice template. Other Labelled Fields may include vendor custom fields on their particular invoices.
- Select the Labelled Field option in the Add Rules action in Field Rules tab
- You are presented with a list of invoices assigned to that vendor in the current Yoga tenant. Select a document.
- You are presented with a popup of the pdf viewer and pdf mapping. Model Fields are key values typically found on standard invoice templates. Other Labelled Fields may include custom fields specific to this vendors invoice template. Both tabs can be utilized to use invoice data to generate your rule. Select the value from either tab that maps to the value
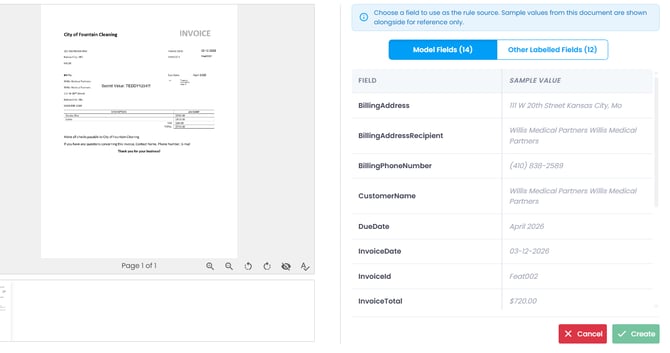
- Once selected, you will see in the pdf viewer that the value is boxed in blue to show where the value is found on the invoice for confirmation.
- Select Create.
- Your rule is created, where you can add additional conditions or approve to make it active.
Click here for a link of how to create a Labeled Field Rule
Create a Form Field Rule
Form Field rules are useful when extracting another field on the Yoga form and you want to reuse that same value for something else. Examples may include: account number populated in a description field or being utilized for GL mappings, legacy PO number in a description field, etc.
- Select the Form Field option in the Add Rules action in the Field Rules tab.
- You are presented with a list of available fields on which you can build this rule on. Select a field.
- Your rule is created where you can add additional conditions or approve to make it active.
Click here for a demo of how to Create Form Field Rule
Create Composer Rule
Composer Rules are handy for invoices such as utilities, where we want to "compose" a value from multiple parts of an invoice. For example, some utility invoices don't always contain a true invoice number. For this specific utility vendor, we like to use a combination of Account Number + a formatted invoice date. In order to create a composer rule, we must first create Variables to utilize in our rule.
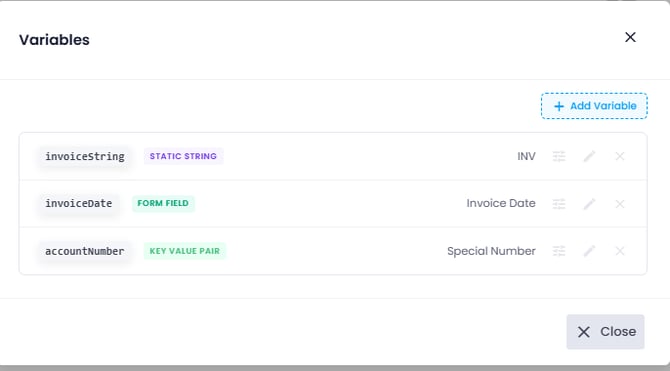
- While in the Field Rules tab, above the Invoice Fields, select Variables.
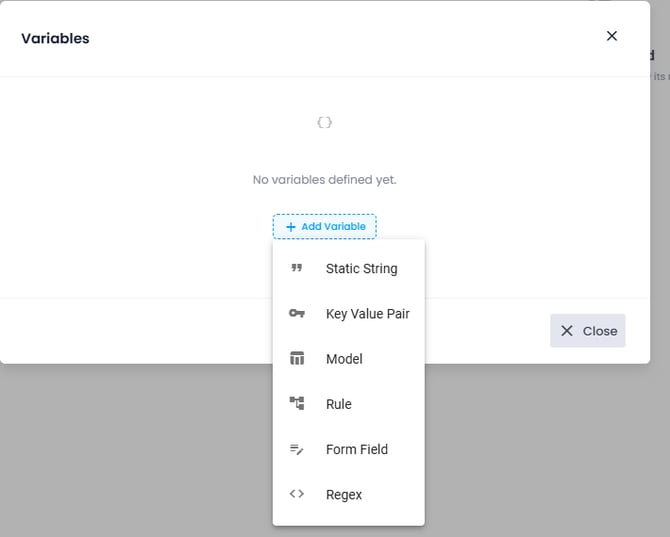
- If no variables exist, select Add Variable.
- From here, you are provided with a list, similar to that of our other rule types to select from. For this example, we are going to create a variable based on a key-value pair field. Select Key Value Pair.
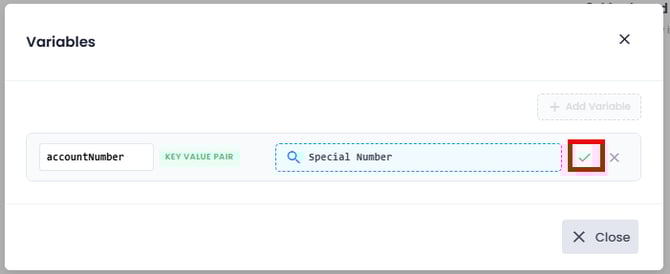
- Give your variable an ID.
- Select the lookup for KVP Fields.
- You are presented with a list of documents in the system for that vendor, select an invoice to open.
- From here, you can select different keys or labeled fields to create this variable against.
- Once the first variable is complete, select the green check mark to save.
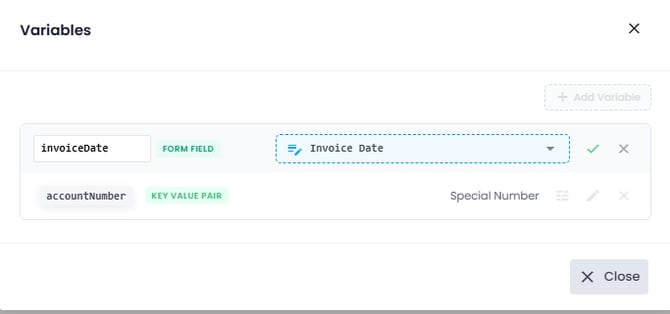
- Add another variable by selecting + Add Variable.
- This value we want the invoice date, so we can utilize the Form Field variable type.
- Input a variable ID.
- Select the field you'd like the variable built on. Select the green check mark to save.
- For our last variable, select + Add Variable.
- This variable, we are going to create a Static String.
- Input a variable ID.
- Our static string is going to be "INV". Select the green check mark to save.
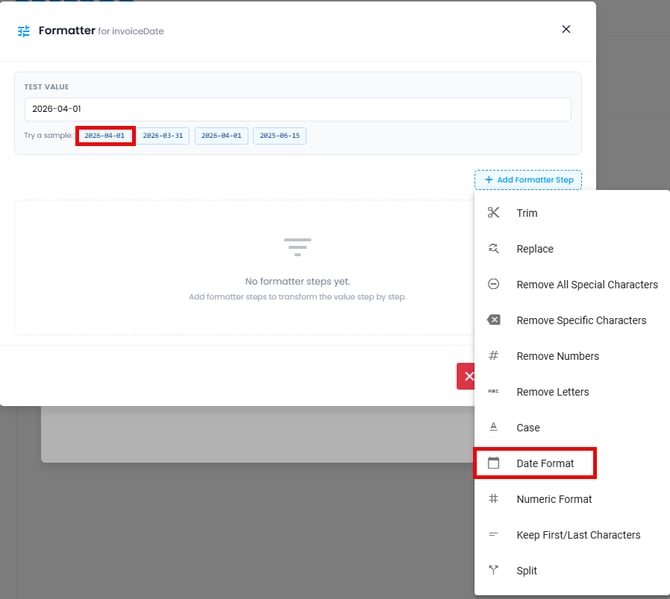
- Within the Variables, you can also create custom formatting specific to your value extracted, such as making a full invoice date be just MMYY. Next to the invoiceDate variable, you will see an icon for formatting. Select the Formatter.

- At the top, you can input a test value or select a default one.
- Select Add Formatter Step. Since we are formatting a date, select Date Format.
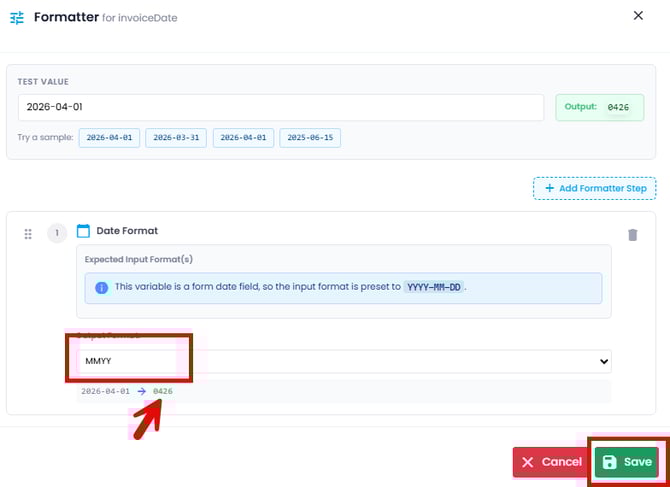
- The date formatter appears. In the Output format, select the format applicable for this variable (ie. MMYY).
- Once you've selected an output and it displays as you'd like below, click save.
- We now have our three variables. Close out of the variables window. Add a new rule and select Composer.
- This is where you are now able to add those three variables created together with different delimitators between them to compose your final value. Simply select Add Variable to begin composing your rule.
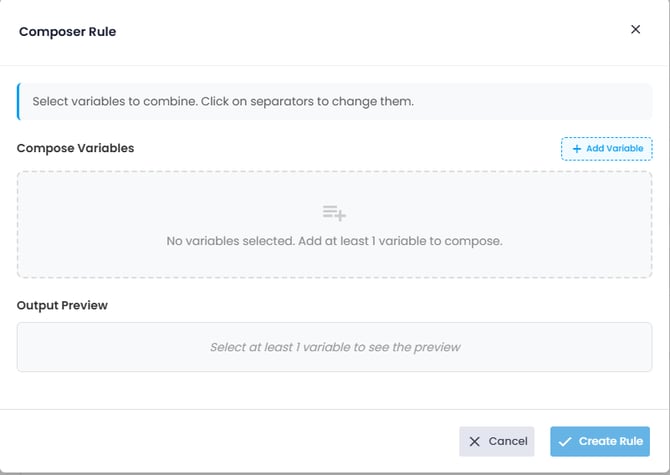
- Once added, you'll see that between each variable, you can add different delimitators. You will see an example preview printout below. Once complete, select Create Rule.

- Your rule is created where you can add additional conditions or approve to make it active.
Click here for a demo of how to create a Composer Rule
Create a Currency Sum Rule
Currency Sum rules are extremely helpful when, for example, a vendor states shipping and handling as two separate charges on an invoice, but you need to add them together to post to your freight total field. This rule type is only available when the form field is a currency field (starts with $) and will perform any field clean up to ensure no values are added or saved weirdly (USD listed vs $, etc)
- Add a Field such as Freight total or AOC lines.
- Select Add Rule and Select Currency Sum.
- Select a document from the view to map against.
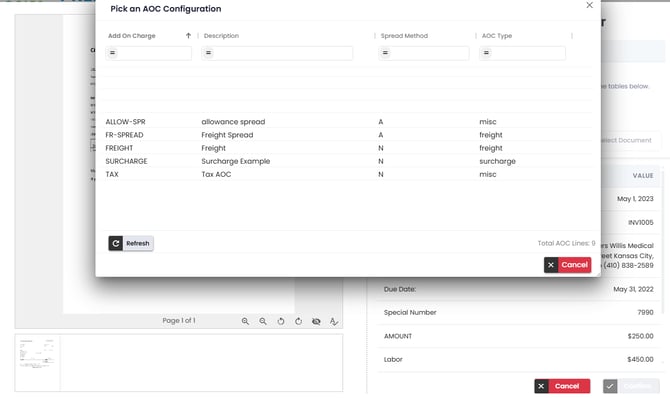
- If you selected the AOC lines for your field in step 1, a pop-up will appear to select which cost code you'd like this rule created against. Select the correct cost code.
- Select all valid Keys or Model fields that apply for this value. Once selected, you can select additional document samples to grab other values from as well to add to your query by selecting Select Document.

- Once all valid keys from any known documents are added to this query, select Confirm.
- Your rule is created where you can add additional conditions or approve to make it active.
Click here to watch how to create a Currency Sum Rule
Once you have any of the above rules created:
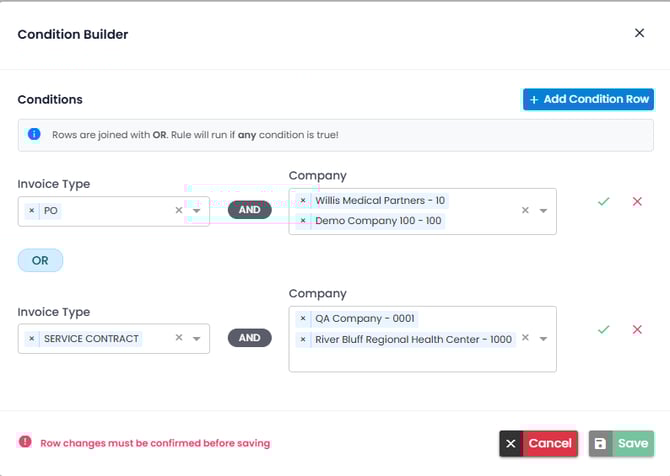
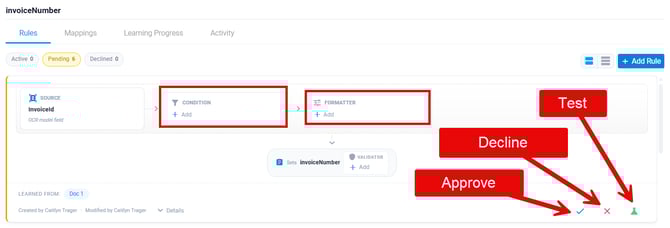
- The rule is created and put in the pending tab. From here, you can adjust the value extracted to meet your processing requirements and input conditions for when this rule should take place.
- Source - Adjust the value on the invoice that the rule will come from
- Condition - When should this rule take place (Company #, Invoice Type, etc)
- Formatter - Remove special characters, format a specific way, limit characters, etc
- Input a test value in the bar at the top of the popup.
- Select Add Formatter Step. The order the steps are in the popup, is the order they will take place to create your final output.
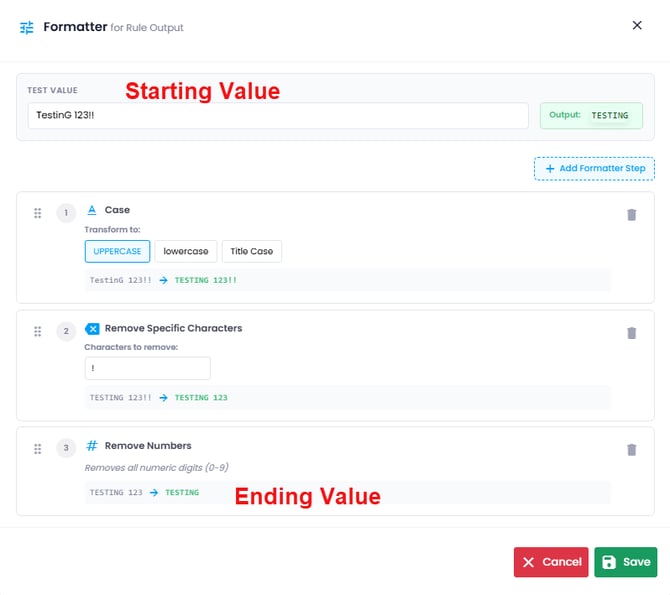
- Select Save once complete.
- Once you've adjusted your rule, you are presented with three options at the bottom - Approve, Decline or Test. Select Approve Rule to make the rule active.
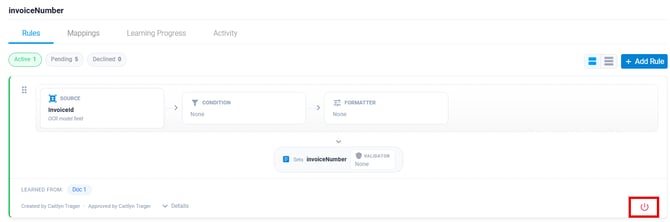
- Rule should appear in the Active tab.
- To put the rule back into a pending state to be edited, select the power button.
- Select the testing button on the rule to ensure the rule is created the way your team needs.
- You are presented with a pop-up to run a Smart Set (positive and negative examples), or you can select specific invoices within the system. Run the test to ensure the rule works as expected.

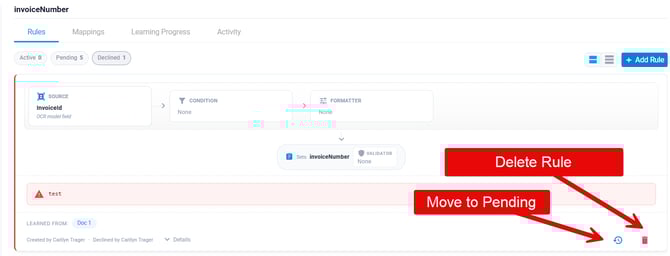
- If a rule isn't needed anymore, you can decline the rule to remove it from your key field rules views. Select Decline Rule.
- You will be required to insert a decline reason. Select Decline Rule. The rule is made visible in the Declined tab.
- To delete the declined rule, select the trash can. If the rule is applicable again for this vendor, select the Move to pending button.
Mappings - Utilized for Company, Routing, and General Ledger, for example
Mappings move your team's custom spreadsheets or internal structures to Yoga to perform additional automation in areas like selecting Company based on the Bill to location, routing values based on an invoice reference field, and GL coding based on an account number for your utilities. Yoga can support as many or as few mappings as your team would like to move to the system. As a safety mechanism, if Yoga isn't 100% confident in a value, the mapping won't take place and the team can still continue to process manually without fear of incorrect extraction.
For fields like Company, Routing Category, and Routing Codes
- Go to the Field Rules tab.
- Create a rule for Invoice Routing Category.
- The routing category in this example is usually selected based on the Account Number on the invoice. Create a rule using the Form Field rule type, then select Account Number.
- Ensure the mappings flag is enabled.
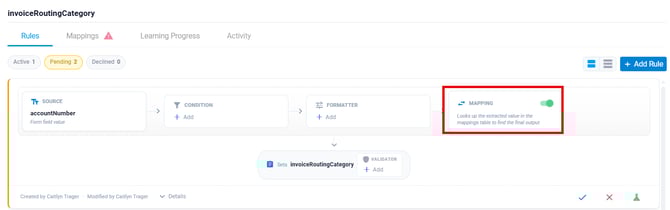
- Navigate to the mappings tab.
- Select Add.
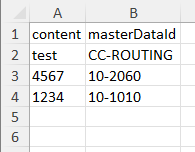
- For values like IRC or Company, you will be provided with a field to input the content string from the invoice that helps map to a designated IRC.

- For the GL field, you will be presented with your organizations GL structure.
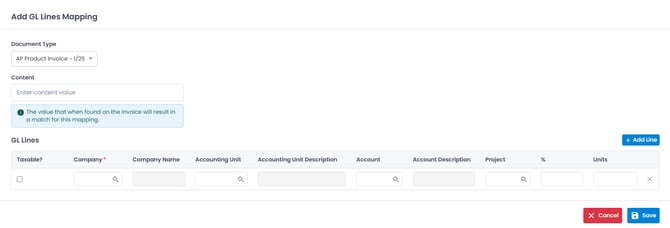
- For the GL field, you will be presented with your organizations GL structure.
- Select Add mapping or Add Line based on the mapping you are in. There is no limit to how many mappings you can create in the system.
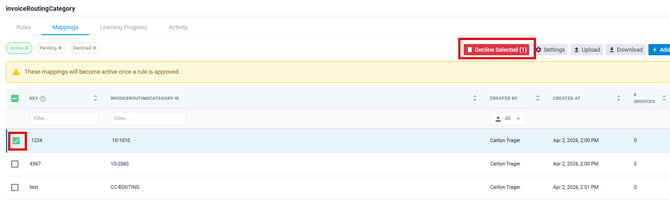
- If a mapping is no longer applicable, simply hover over the mapping and select delete.
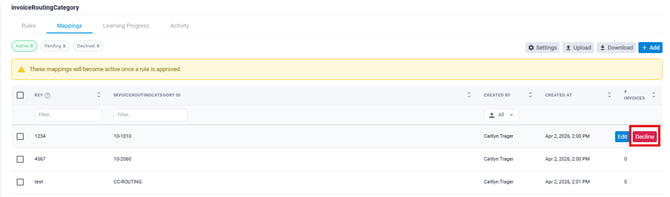
- You can also select the checkbox next to the row and select Delete Selected.
- If your organization already has a mapping table of values that map to a field such as the IRC, you can take a download file from the mappings page to give you a template, complete the table, and then reupload.
- The system, once a rule is created, may also populate pending mappings for the team to review and approve. Those can be found on the Pending tab.
Click here to see how to create and decline Mappings in Yoga
Learning Progress - As the system learns how your team processes, learned values will be made available in this tab to decline or promote
The system learns as the processor keys invoices 5 times the same way per vendor. For example, on some invoices, vendors may not store the PO number in a clearly labeled field. If users manually key the invoice where we can determine the PO is in an Order Number field, a rule will generate and propose to the team to be approved. Some vendors may have specific labels for add-on charges that Yoga doesn't have in its list to extract; the system will learn those values as well.
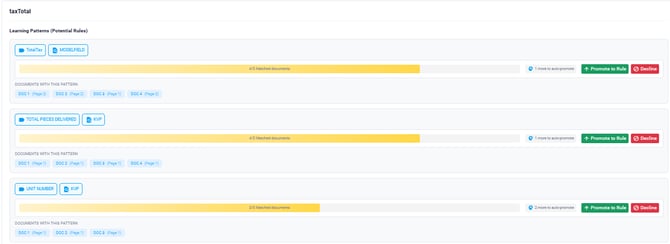
If you have validated that the rules recommended by the system are accurate, you can promote the rule earlier by selecting the Promote to Rule button. For values the system learned incorrectly, you can select the Decline button to prevent further learning on that value for this field.
Rules promoted are put into a pending state, where you can add additional conditions of cleanup to the extracted values. Once complete, approve the rule to make it live in the system
Activity - Tracks all edits, activations, deactivations, etc of rules specific to this field
Back to topTest Rules
Once you have created any rules in the system, there are a couple of ways to test those rules live on processed invoices: direct rule testing or via the Test Rules tab.
Direct rule testing from the rule:
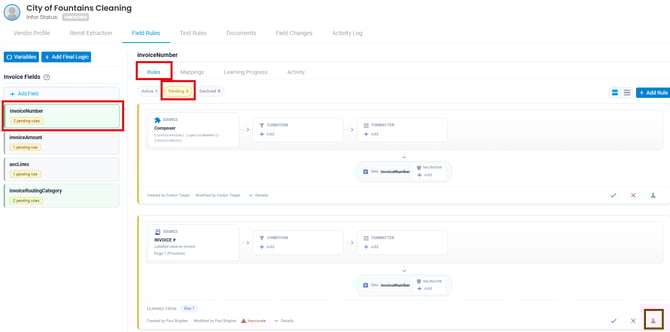
- Navigate to a rule in the pending state in Yoga.
- Once inside the pending rule, select the test button in the bottom right corner of the rule card.
- A window appears to run a Smart Set or manually select your records.
- A Smart Set allows you to run a set number of assumed positive and negative test cases on invoices in the system for this vendor. To adjust the number, type in the number for each set or utilize the arrows to increase or decrease.
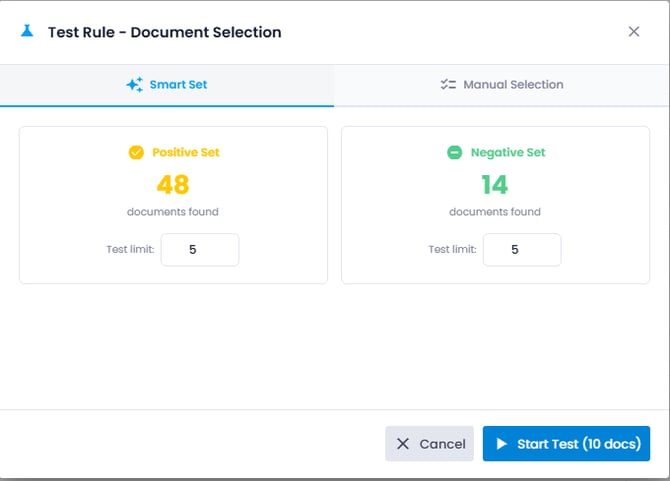
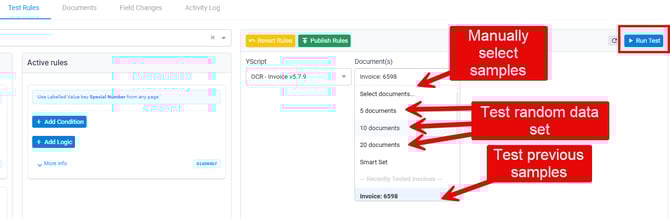
- Manual Selection allows you to run a test on specific invoice samples in the system you select. To select, simply select Browse Documents to select documents to run your data set on. If you've run testing on this vendor before, you may have the option to run the test on the last testing group.
- A Smart Set allows you to run a set number of assumed positive and negative test cases on invoices in the system for this vendor. To adjust the number, type in the number for each set or utilize the arrows to increase or decrease.
- Select Start Test once your data set is selected.
- A pop-up is presented informing you that Yoga is running your rule on the data set.
- Once testing is complete, you can select the Details drop-down for your rule to see how the testing was conducted on your data set.

- Select the number of documents to bring up the test results.

- The pop-up shows if invoices would improve, be unimproved, regress, or be unaffected with your sample set to assist you in seeing if this rule would work as expected.
- The pop-up also shows the original value, the rule value, and has a direct link to the document for you to utilize as a reference. No actual values are updated on the Yoga form during testing.
- If the rule works as expected, users can simply select the check mark in the bottom right corner of the rule card. If the rule needs adjusting, you can edit it in the card directly, add conditions to improve accuracy, or add formatting to clean the values presented in testing.
Test Rules tab
- Navigate to the Test Rules tab in Vendor Management.

- Upon selection, you are taken to an area where you will be able to test rules one-off, similar to the above.
- In the Select field tab, select a field you'd like to test against.
- All rules in Pending will appear in the Inactive rules column, all Approved will appear in the Active rules column.
- Rules in the Active column will be tested against. You can add additional logic or conditions directly from the test module.
- To test the rules, ensure at least one is in the Active column, then select invoice samples from the Document(s) list.
- Once your data set is selected, select Run Test.
- Once you've run the test, documents will start to print out in the results.
- In the dropdown, select each invoice to see its results. The left column is the current form values, and the right column will show updates from your rule value.
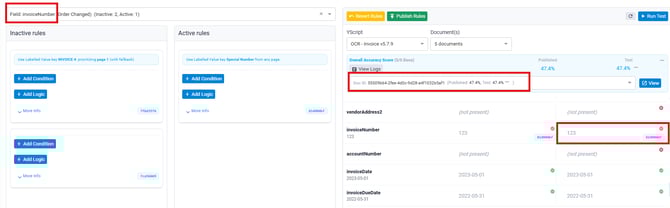
- If the rule ran as you'd expect, simply select Publish Rules to make it approved in the Field Rules tab. If you need to continue editing the rule, you can do so in the Field Rules tab on the card or here in the Test Rules area.
- If you want to put the rules back to their original states, you can select Revert Rules.
Back to top
Documents
In Yoga, users can store vendor documentation within their Vendor Management page. These documents are strictly for storage and are not mapped to the ERP.
- Navigate to the Documents tab.
- On the far right-hand side of the screen, select Upload Document.

- In the pop-up, you are presented with a list of preset document types. Select the document type you'd like to upload for this vendor.
- Enter a Document Name.
- Enter the expiration date, if applicable.
- Drop a file in the drop zone or select inside the box to bring up your file explorer. Select a file from your file explorer to upload.
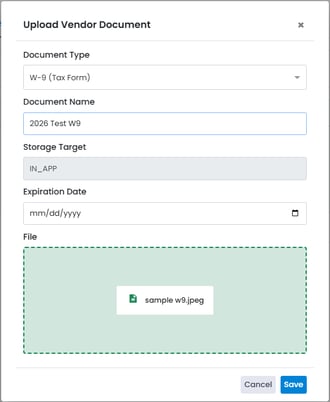
- Once complete, select Save. The file is then displayed in the Documents tab.

- To view the document, select the "eye" icon.
- To replace the document, select the orange "paper" icon.
- To download a copy of the attachment, select the green "download" icon.
- To remove the document from the documents page, select the "trash" icon.
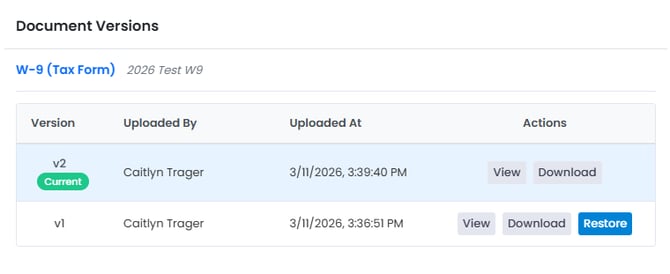
- Selecting the Versions option will show all the versions uploaded for this document. From here, you can view or download that document. If multiple versions exist, you can restore an older version by selecting that action.
- Selecting the Activities option will show all actions that have occurred on this document.
Back to top
Fields Changes
The Field Changes tab tracks your top field changes, per vendor, per value in the field. This can help in creating custom Field Rules or even Remit Extraction rules to increase extraction in the system for this vendor. The report shows the initial value as it came into Yoga, the value after the record was processed, the pattern count/how often that value was updated to a Final Value, and if something was mis-extracted (value A changed to B) vs something didn't even extract.
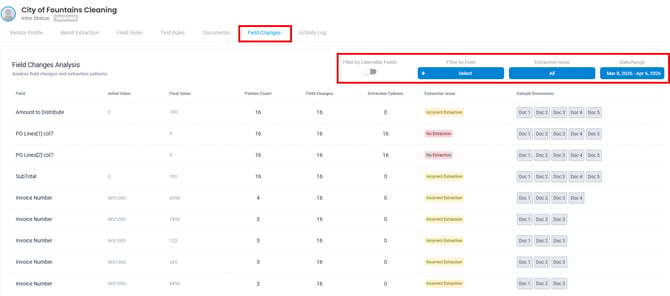
Once inside the Field Changes tab, you are shown all field changes from this vendor, per field, based on the selected date range in the right-hand corner. Select the different column headers for Pattern Count, Field Changes, Extraction Failures, or Extraction Issues to sort the values in the columns together. Select specific documents on the right on each row to have direct access to different examples for this field change in your system.
-
To adjust the date range, select the Date Range pop-up. You are presented with a similar user experience to the reports area today. You can select Today, Last 7 Days, Last 30 Days, Last 90 Days, This Month, Last Month, or select custom dates utilizing the calendar.
- Certain fields in Yoga are flagged as learnable on the backend. These are common fields that AP may select that Yoga would be able to configure rules against. To limit the list to only show these fields, select the Filter by Learnable Fields option above.
- To review specific fields for this vendor, such as Invoice Routing Category or Company, simply select the Filter by Field option above and select all fields you'd like available in this list view.
- To see items based on the Extraction Issue, you can select the Extraction Issue filter to search specifically on No Extraction vs Incorrect Extraction to review those values.
Back to top
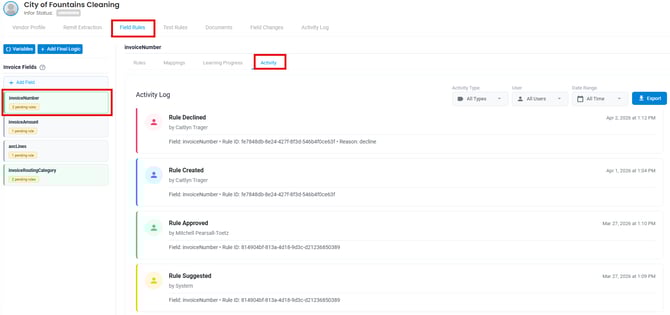
Activity Log
The Activity Log tracks all changes to any of the previous tabs discussed for this vendor. This tab tracks adjustments to the rules and mappings in this vendor's profile. You can track these items per activity type (edit, create, approve, decline, etc), per field, and per user for a specific date range. Selecting the different cards in this activity log will take you directly to the rule card the activity took place. Deleted fields will not have rules cards. Once deleted, you will be unable to access those rules once removed.
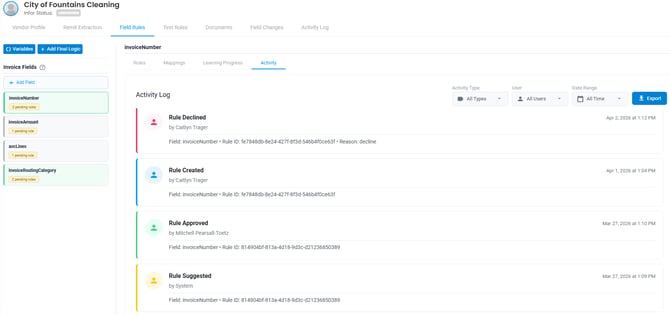
To see another version of the Activity Log directly in the Field Rules, you can select an Invoice Field on the left-hand side and navigate to the Activity tab to see similar information specific to that field. Select the Activity card to take you directly to that rule.