Overview
This guide serves as a walkthrough of the Yoga for FSM - AP solution. Yoga is a SaaS (Software as a Service) solution for OCR and document handling. Yoga for FSM - AP was created to address common issues that occur when indexing documents while ensuring compatibility with Infor CloudSuite Financials, Lawson v10, and Workday. It allows for indexing documents with OCR (Optical Character Recognition), coupled with a smooth end-user processing experience to bring invoice forms and their images to your ERP for approval and payment.
Please use the Table of Content hyperlinks below to navigate quickly to a section of interest:
How to Sign In
To sign into Yoga, you will use the default Yoga URL. Once logged in, you can switch between tenants as needed.
If signing in with Microsoft, select Login in top right corner
If signing in with Okta security, select Login with Okta in top right and follow the prompts for your work email
When first attempting to login with Microsoft, you might be greeted by the Yoga login page. After clicking on the Login button in the top-right corner, you’ll be taken to a Microsoft SSO page where you’ll fill in the necessary login and authentication information before being routed to your Yoga profile’s default tenant and view.


Capturing a Document
Most invoices will be captured using the Yoga Connect Intelligent Email Capture or by scanning. Additionally, you may create invoices manually in Yoga for FSM. Below are the steps for Yoga for FSM’s Manual Capture:
- Navigate to the Left-hand Vertical Pane and select the Capture option
- Select Add Invoice, and you will be redirected to the Capture Page
- Supported file types are called out in the upload window. Either drag and drop a document file from your file system into the drop zone or click on the drop zone and select a file from your file explorer.

- The image(s) will populate in the initial PDF viewer.
- If the PDF has multiple pages, you can toggle through the pages below the PDF viewer.
- Users can also zoom in/out and rotate the image if necessary.
- Multiple invoices can be added to capture if needed.

- If the status of the document is Ready, you may click the green Add Invoice button in the top right of the page

- If the document is uploaded successfully, you will see the ready status has changed to “Document created”

Processing an Invoice
Once an invoice has been captured via any of the three methods, it will be sent through OCR (optical character recognition) and the form fields will attempt to be extracted. Once it has gone through OCR, it can usually be found in the AP Review queue; otherwise, it might be in OCR Error or AP Duplicate Invoice. All Views and their functions are listed in the table below.
(These views and their names are customizable by tenant)
|
View |
Function/Definition |
|
All Invoices |
Contains all invoices that have been processed to date. AP Processors should not work invoices in this queue; it should only be used as a way to find invoices across other views. |
|
AP Cancel |
Contains all invoices or items that have been cancelled. Only use if invoice is no longer needed. Utilized as an archive or trach view in Yoga |
|
AP Duplicate Invoice |
Contains all duplicate invoices. Invoices are flagged for having identical PO/Invoice information to Invoices already uploaded to your ERP. Invoices can be moved here automatically or manually and can be reviewed if needed. |
|
AP Paid |
Contains invoices that have been flagged as Historical/Paid in your ERP CloudSuite. Invoices are moved here at least once a day in Yoga via job. |
|
AP Review |
Contains all invoices that have come into the system and are awaiting processing/review. Reason codes can be utilized to guide users on elements that need their attention |
|
Awaiting Payment |
Contains all invoices that have been posted to your ERP successfully. |
| EDI | If utilizing Yoga's version 1 EDI image generation solution, those records that cannot be posted over to your ERP due to no found Payables Invoice can be found in this view. EDI Document Type items only. If users route the document through OCR to process as a new invoice via Yoga, the document will no longer be found here. Documents are removed after 30 days. |
|
OCR Error |
Contains all invoices that had an extraneous issue during OCR/extraction. This view is monitored by your Yoga SaaS team. (size of document, encryption, not an invoice, etc) |
|
Purchasing Invoice Resolution |
Contains all invoices that need supply chain team to work with us on. (Closed PO, Cancelled PO, Missing PO, Invoice Vendor and PO Vendor differing, Line missing, Line closed) |
|
RPI Review |
Contains invoices that need further review from Yoga Saas team. This view is monitored by the Yoga SaaS team. (integration issues, need assistance from client team on processing, troublesome invoices) |
|
Statements |
Contains statements which can’t be processed in the AP Review queue but AP may still want accessible to review. |
|
Vendor Maintenance |
Contains all invoices that need Vendor Master adjustments made. This view should be seen as a holding queue for the invoice while the vendor master updates are being updated in your ERP. (New Vendor created, needing additional remit to) |
AP Review
This view is where you will do most of your work in Yoga for FSM. After a document has been captured and sent through OCR, it may end up here if further review is needed. This view contains a searchable and sortable list of invoices that are pending review. It is Best Practice to work AP Review using the "Oldest to Newest" Invoice method.

A single click on a record in this view will redirect you to the invoice form. You will need to fill out and/or correct the form with the invoice information so it can be posted to your ERP. All required fields to enable routing will be indicated by a red * symbol next to the label.

Customizing Your View / View Actions
You can adjust your view columns by selecting Customize View at the bottom of the page. Any new columns you add will appear on the left. You can also drag and drop column headers to rearrange them. These changes must be made on a per view basis and do not take place on other views in the system automatically.

To resize columns, click and drag the column borders at the top of the page. If there are many columns, a scroll bar will appear at the bottom, allowing you to move left and right.

Filtering and Sorting
You can use the filter and search options in each column to find specific invoices or sort them (e.g., from oldest to newest).
To see what filters or sorts are currently applied, select the View option at the top right. To remove all filters and sorts, click Clear in the same area.

For date fields such as Due Date or Invoice Date, you can select the operator for Between to filter records within a certain data range. You also have the ability to select any of the preset date ranges like Last Month or Past 7 days.
On most columns, you also can sort for is empty (doesn't have a value) or is not empty (contains a value). This can be extremely useful when determining invoices to process where maybe key required fields weren't extracted or visa versa.
Downloading records in a View
If you need a report based on your current view, you can select the download at the bottom of the page. From there you may be asked to Download direct to CSV (will appear in your downloads folder on file explorer) or you can send a link report to your email. This link can only be accessed by users with access to the tenant the download took place from. Once you receive the email, select the link to take you to the tenant to download.
All filters and sorts will remain for both of these download options.

Locked Documents
If you see a lock icon in the Status column, it means another user is currently working on that document. You can still open it to view, but only the first user who accessed it can make edits. This prevents multiple users from editing the same document at once.


Performing Mass Actions
Some users may have the ability to perform actions on multiple records at once:
- Select the checkbox next to the records you want to update.
- At the bottom of the screen, click the Action button.
- Choose the action you want to perform, such as assigning Invoice Routing Categories, Processors, or using Reason Codes for mass routing.
This feature helps speed up tasks that require updates to multiple records at once. You cannot utilize Mass Actions on locked documents or documents that are not in the same queue (1 document is in Duplicate another in AP Review).

Document Viewer
From the Document Viewer, users will have the ability to visually manipulate the invoice.
- Navigate to the AP Review tab in the Left-hand Vertical Pane
- Open your document
- On the left half of the screen, you’ll see the PDF Document viewer
- Using the icons in the bottom right corner of the PDF viewer, you can zoom in, zoom out, rotate counterclockwise, rotate clockwise and view/not view the extraction areas of the document

- You can also view all your pages of a multi-page document below the Document Viewer. Hop between pages by selecting the needed page below the Document Viewer or using the arrows off to each side of the Document Viewer

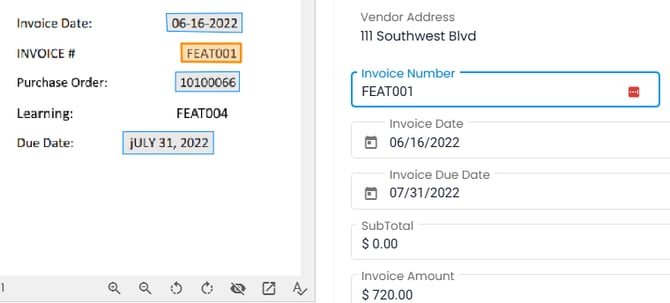
- Values in the pdf the may be surrounded by a blue box are items that were attempted to be extracted via OCR and mapped to the invoice form. Hovering over these values you'll be able to see what the system thought that value is and the confidence of extraction. If the confidence is below a certain threshold, the value might not be posted to the form.
- Users can utilize the form on the right-hand side of the page to find the value on the PDF itself. Simply select inside a field (Example: Invoice Number) on the form itself. Review the pdf on the left-hand side for a value with an orange box around it. This is the value that was selected from the invoice to populate this field.
- Users can also manually pop the image out of the page to a new tab to allow for more form real estate. If you'd like this to pop out all the time, take a look at the Profile setup portion of this guide! Select the pop-out icon to move the image to a new tab.

- Is some of the text showing up a little funky on your invoice? This usually indicates that the vendor has a font on their invoice not supported by your device. Select the Font Adjuster button. This will render those parts of the invoice to a designated backup font supported by all devices to render correctly.

Primary and Supporting Tabs
Yoga can store two levels of documents, primary and supporting, within the Document Viewer. On upload, all attachments on emails go to the Primary tab and if ingested via email, a rendering of the email itself goes to Supporting. In this section, we will walk through how users can upload additional documents to these tabs.
- Open a document in Yoga from any view.
- Upon open, you are presented with your pdf viewer on the left and Yoga eForm on the right.
- Below the pdf viewer, you should see two tabs, Primary Document and Supporting Document.
- If there are documents attached to these tabs, you should see a number indicating how many pages are on each

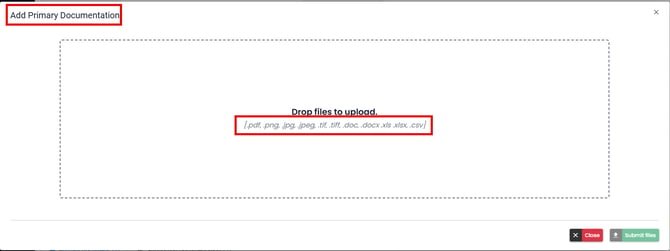
- You will see a blue upload box on each tab. On the Primary tab, click the blue upload icon. You are presented with a drop zone pop-up. You can drag and drop the allowed file types to the area or click in the area to bring up your file explorer to upload. Once files you'd like to upload are added, select Submit Files.
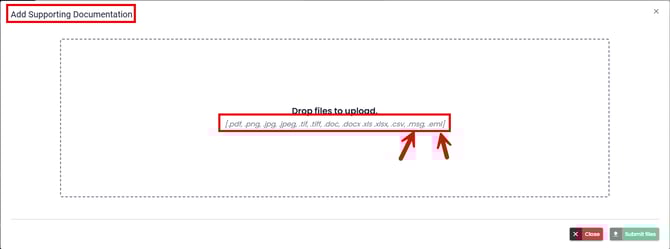
- On the Supporting tab, click on the blue upload icon. You are present with a drop zone pop-up. You will notice the supporting tab has two additional types that are supported: MSG and EML. You can drag and drop the allowed file types to the area or click in the area to bring up your file explorer to upload. Once files you'd like to upload are added, select Submit Files.
Text extraction
All OCR’d documents in the system have the ability for users to pull data directly from the pdf viewer to the eForm on the right-hand side of the screen. This helps limit the risk of manually keying values on the eForm in the system.
- Select inside a currency, text, number, or popup field
- Select CTRL on your keyboard
- You should see a note appear in the pdf viewer and different values extracted highlighted in yellow

- You should see a note appear in the pdf viewer and different values extracted highlighted in yellow
- Select the value or drag a box over the values needed within the pdf viewer that you would like to populate in the selected field.
-
- The value then appears in the eForm field selected. Selecting inside the field will now make the new selected value appear with an orange box.
Routing
From the AP review window, users will have the ability to route documents to different queues based on the documents’ needs. Routing documents is customizable per tenant and is currently configured within the queues. Users will not be able to route documents until all required fields (indicated by a *) have been filled out unless the user opts to route without saving or utilizes a Routing Code. See below how to route your documents to a different queue:
- Navigate to the Left-hand Vertical Pane
- Under the Views dropdown, select AP Review
- Towards the top right of the AP Review window, you’ll see four buttons: Cancel, Save, Route and Document Notes. Select the Route dropdown

- Here you can route the document to its correct queue to be reviewed by another resource, mark it as a duplicate, or whatever queue you may have set up for various reasons.
(Depending on what queues are set up for a particular tenant, they can depict where documents can be routed from what queue to what queues)
Document Notes
Document notes are a way for users to document any findings, concerns or questions following that document. This area will also track any routing taken place on this invoice. These are then transferred with the document to your ERP as an ‘Invoice Comment’ in the rest of that document’s workflow.
- Navigate to the Left-hand Vertical Pane
- Under the Views dropdown, select AP Review
- Towards the top right of the AP Review window, you’ll see five buttons: Cancel, Save, Post to Infor/v10/Workday, Route, and Document Notes. Select Document Notes

- A light gray panel will appear to the right of the PDF image viewer and Form Browser

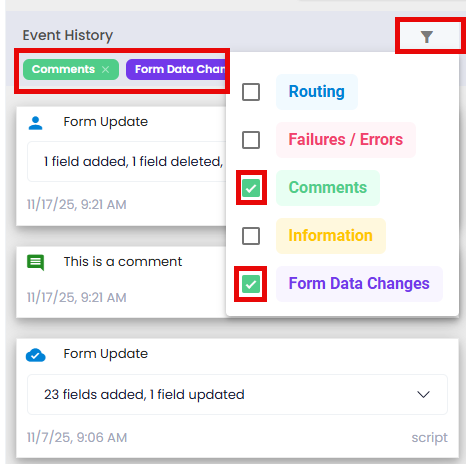
- Here, you can view any comments other users have associated with this document, route actions, adding and removing of reason codes, form updates, and any error from OCR or posting.
- The above actions are all filterable as well! Select the filter action across from "Event History". You can limit what you see in this area by selecting the various checkboxes next to the different events. You will see the filtered options appear below Event History.
- These filters persist across views and across documents until removed.
- To remove the filters, simply select the check box next to the specific filter you want to remove or "Clear All" to show all data areas again.

Processing Scenarios
PO Lines or Head Closed
When validating a Purchase Order invoice, your PO lines, or header may be returned as closed or don't exist and buyers may need to assist. To resolve this issue, you will need to route to Purchasing Invoice Resolution.
There are certain aspects of a PO that need to be resolved before we can process an invoice to our ERP. Scenarios to route to the Purchasing Invoice Resolution (PIR) queue are highlighted below:
- PO is missing
- PO is closed
- PO vendor ID doesn't match the Invoice Vendor ID
- PO line is missing
- PO line is cancelled or closed
(Note: all invoice line discrepancies, such as amount available, unit cost, or UOM will take place in your ERP with buyer messages).
- With your document open, click on the Route button.
- Click on Purchasing Invoice Resolution.
- A pop-up may appear stating that there are ‘Unsaved changes detected’ – you may choose to Save and Route, saving the changes you have made to the document, or you may choose to Route without Saving your changes

- A pop-up may appear stating that there are ‘Unsaved changes detected’ – you may choose to Save and Route, saving the changes you have made to the document, or you may choose to Route without Saving your changes
- A green pop up should appear in the bottom right of your screen stating that the ‘Document Successfully Routed’.

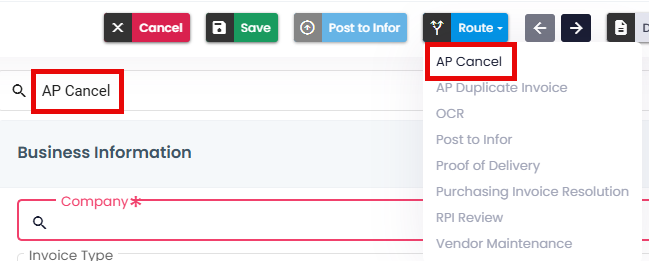
Canceling an Invoice
There may be instances where an invoice doesn’t need to be reviewed and go through the approval process, but you don’t necessarily want to delete the invoice. That is where the AP Cancel queue comes into play. You can route this document to the queue where it will still be present but maybe doesn’t need to go through the full invoice workflow.
- From the AP Review view, select your invoice from the list
- You need to cancel the invoice, maybe the vendor sent you the wrong one, but you don’t want to lose the record, you can select the Route drop down in the top right and route the document to the AP Cancel queue
-
This document will then leave the AP Review queue and move to the AP Cancel queue where the document is still viewable but doesn’t necessarily need to be reviewed
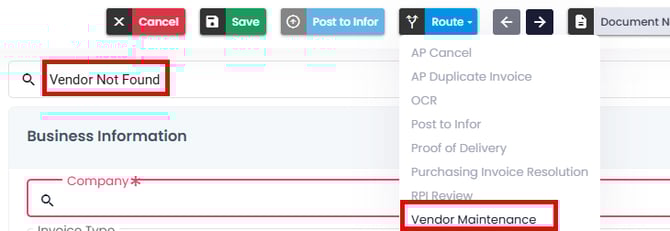
New Vendor or Vendor Updates
- An invoice has come into your queue for a vendor that does not exist or their address need to be updates.
- Navigate to the reason code section and select Vendor Not Found
- This reason code then allows you to bypass required fields on the form to route to the Vendor Maintenance holding queue
- In the route options, select Vendor Maintenance
- You will be prompted to add a comment stating what needs to be created or edited on the vendor master in order to process this invoice
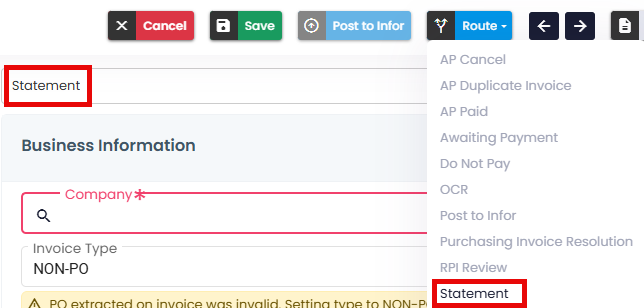
Statements
Some clients want to track statements in Yoga to validate invoices have been paid for that vendor. Yoga has a designated queue for Statements to be held for tracking purposes. Once statements have been fully reviewed by the team, users can route these to AP Cancel.
- Open a statement in AP Review
- Select the Statement reason code
- In the route list, you have the ability to route to the Statements queue
- Save and route
Splitting an Invoice
There may be times when you need to split a multi-page document to be their own pages. Follow the steps below to understand how to do so.
- Navigate to the AP Review queue in the Left-hand Vertical Pane
- Select your multi-page document
- You should be able to see the different pages of the document below the PDF viewer
- In the top right-hand corner of the document, select the three vertical dots, select Split Document

- The Split Document window appears. Within this window you can split up multiple or individual pages of a document

- When you split a document, you’ll select which queue to route the pages to.
- If your final document pages need to be sent back to OCR, you can also select the Send Document to OCR option, and it will route all remaining pages to OCR as a collective document. This option is unavailable if you have any documents selected, as you’ll need to use the Split Document option to route the documents to OCR.


Reordering Pages
There may be times when you need to reorder pages in a multi-page document to be in a specific order. Follow the steps below to understand how to do so.
- Navigate to the AP Review queue in the Left-hand Vertical Pane
- Select your multi-page document
- You should be able to see the different pages of the document below the PDF viewer
- In the top right-hand corner of the document, select the three vertical dots, select Split Document
- You should see two tabs at the top of the Split Document window: Primary Document and Supporting Documentation. Within the Primary Document page, drag and drop a page into a new position
- You should now see a blue rotate page symbol at the top of the pages moved
- The option at the bottom of the window now state Revert page ordering and Save page ordering

- Select Revert page ordering to put the pages back in order and the split document window options reappear
- Reselect a page and drag and drop into a new position
- Select Save page ordering
- The pages are reorders and the split document window options reappear
Merging Documents
- From any view in Yoga for FSM, open a record
- In the top right-hand corner, select the three vertical dots next to the Document Notes and below your avatar
- Select the Merge Document into option

- Select the document that you need to merge the record into

- From the window, there are several ways to merge documents
- Select Add all to and select Primary Document
- Select Add all to and select Supporting Documents
- Drag and drop pages to Primary Document box
- Drag and drop pages to Supporting Documents box

- To move pages back to the original document, simply select the red X at the top of the thumbnail

- From this modal, you can also reorder the pages as necessary! Simply drag and drop the thumbnail in the "Destination" side of the modal to a different area
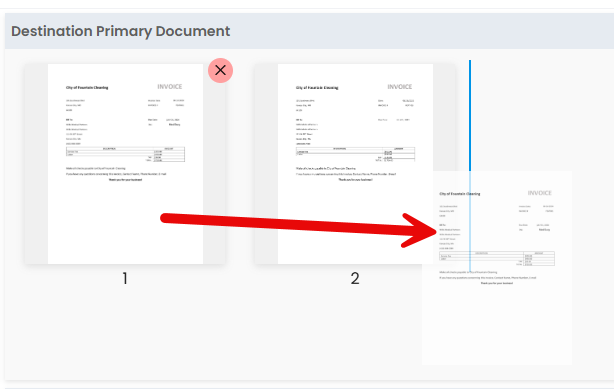
- Once you have moved the documents to their correct location, select the green Confirm Merge button at the bottom of the window.
Email Vendors on Invoices
Within Yoga for FSM, users can send an email on an invoice within the system directly to the Vendor or other personnel without having to download the image or email attachments and manually send an email via their inbox. These emails go to everyone in the To field as a bulk email. If using a custom Sent from email in your Yoga system, the user who sent from the system will also be CC'd on that email. If sending from the default yoga_noreply@rpic.com, emails may look different for your vendors.
- Select the 3 vertical dots in the top right-hand corner of Yoga for FSM
- Select “Send Email”
- The Send Invoice Inquiry Email popup appears

- The Send Invoice Inquiry Email popup appears
- Insert the email address(es) of those from whom you need additional information in the To field. This field supports type-ahead for all users in the system, within the organization, or if you've utilized the email in this field before


- A subject line has defaulted to contain the Invoice Number, but can be edited if necessary
- Type your inquiry to the resource in the Message box
- If you have an email signature configured in your Yoga Profile, it will default in the Signature area. To add a signature or edit for this email, select the Edit Signature button to input a temporary signature line
- Attach the primary document as a PDF is defaulted. If a record came into Yoga for FSM via email, or you have attached supporting documentation that you need to include in the inquiry, select the Attach supporting documentation as PDF
- Select Send Email when you are ready to send
If using an organization email to send from the Yoga system, you will be CC'd on the email sent from the system. Your organization's logo will also be displayed on the email.
Once you've sent your email, you will also see a timestamp in the document notes of who you sent the email to at what time and on what date to assist with tracking. These can also be tracked on the views as an additional column.


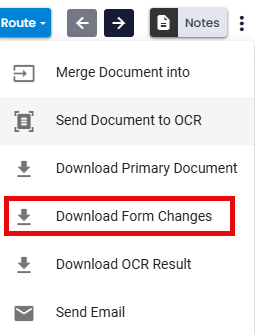
Form Changes
Within Yoga, Super Users and other designated groups may have the ability to track form changes on records in their system, similar to how the audit log or history changes works in your ERP. These are two places' users can go to grab these changes
- Open document notes, scroll down to the Form Update box (this box appears each time the form has been updated and what the updates made were)
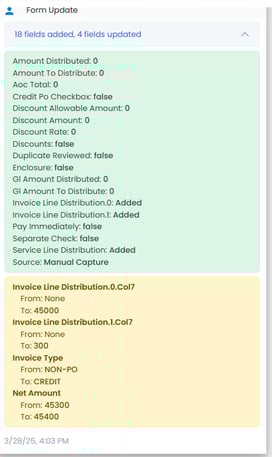
- Select the 3 dots in the upper right-hand corner, select Download Form Changes to download a CSV of all form changes made to this document.
Reports
Reports in Yoga for FSM provide a quick snapshot of the AP environment and can be drilled down to the document level to quickly find documents that stand out in a filtered report. For more information regarding the current reports available in Yoga for FSM, please visit our Yoga FSM Reports Guide
Back to topError Queues for Routing
The below areas in Yoga are monitored daily by your Yoga SaaS team.- OCR Error – documents may be encrypted or password locked, issue with OCR, not accepted file type
- RPI Review – Issues posting to your ERP non-related to processing, API down in ERP, holding place until issue is resolved
Post to Infor / v10 / Workday
- From the AP Review view, select your invoice from the list
- After reviewing the invoice for errors and incorrectly extracted data, you can Save
 the document, ensuring that all fields were reviewed
 - When the invoice is done being reviewed, you can select the Route drop-down in the top right and route the document to the Post to Infor/v10/Workday queue

- This document will then leave the AP Review queue, indicating it has been reviewed and is ready to go through the approval process, auto approve, matching, etc in your ERP
PO Line pairing
- From the AP Review view, select your PO invoice from the list
- You can sort by date created or invoice type for ease of searching
- When in your invoice, scroll down to view the Invoice Details area
- Here, you will be able to see the PO lines that were extracted from the invoice during OCR
- If the lines weren’t able to pair automatically, possible reasons include:
- Unit cost differences between the PO and the invoice.
- UOM (Unit of Measure) mismatches that prevent automatic pairing.
- Missing master data, meaning the PO line is not recognized in the system.

- Select the magnify glass in the column to the left of PO Line # column to pull up a window that shows the line-item results associated with that PO number in the master data

- Select the correct PO line that corresponds to the invoice
- Once your lines are paired, they will be highlighted in green

If the line was not extracted or does not appear, you can:
- Click "View PO Lines" to search for PO lines in the system.
- Select the correct PO line and choose:
- Add & Pair PO Lines – If the invoice line matches the PO exactly.
- Add PO Lines – If adjustments to QTY or Unit Price are needed before pairing.
If an incorrect PO line was selected, you can:
- Unpair Lines to reattempt pairing.
- Remove Selected Lines if they do not belong to the invoice.
- Unpaired lines will remain highlighted in gray until properly matched to a PO line.
Add-On Costs (AOCs)
- The AOCs for any document will be present anywhere you can view and manage the document. In most cases, this can be from within any of the queues under the View drop down in the Left-hand Vertical Pane
- Select the queue your document is under, search within that queue and open your document
- On the right-hand side of the page, about halfway down, you will see a drop down called Add-On Costs
- If not already, open the drop down using the light blue arrow on the right-hand side of that gray bar
- Here, you should see the different add-on costs that are built out for your tenant to be present

- If there was information within the PDF that was extracted for these fields, they would appear here
- If any of the above AOCs needed additional rows, you that may not have extracted or you needed to separate out these costs (Ex – the taxes on the invoice were added together within extraction but you needed to see them separately), you could select Details for that line and add another line

- Also from within the Details pop up window, you could delete line items if applicable by selecting the item and hitting the Delete Selected button in the right-hand corner

General Ledger (GL) Lines
Some clients may have the ability to add GL lines to their Yoga forms! This can be required on the Yoga from for certain invoice types or option based on your tenants configurations. These lines are posted to the Distributions tab in your ERP.
- Navigate to a non-po invoice in AP Review
- Your AP team knows the GL coding for the invoice. Navigate to the GL Lines section on the form
- The columns should be customed for your GL structure in your ERP
- There are two ways to add lines to the GL area: simply add a line or a csv upload
- For the add a line, simply navigate to the Line Actions button on the far right of the section
- Select Add Line to simply add one line at a time.
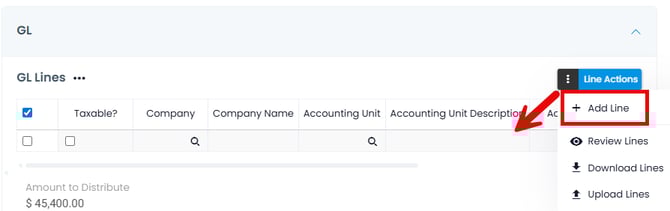
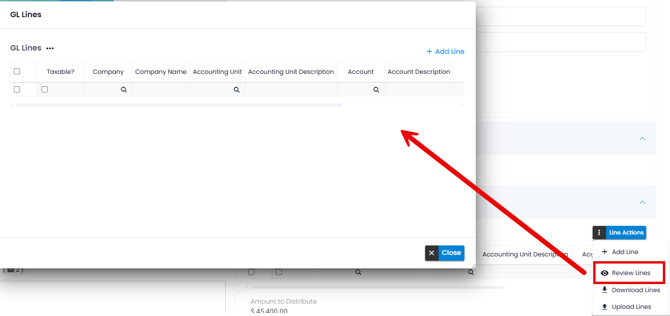
- Select Review Lines to add lines in a GL modal
- Select Download Lines to get a fresh csv on the expected template to utilize the upload lines feature
- Insert the necessary lines of GL for the invoice and then reupload the completed file to add the lines
Generic Invoice Lines
For our Workday and other clients, you may have access to a generic invoice lines field. For Workday clients, this is typically where you are able to input you coding for your invoices like non-pos and credits while inputting things like item descriptions, quantity, unit cost, and the appropriate Worktags.
The invoice lines can also be utilized for FSM clients looking to track their nonpo invoice data further. This field type can be completely customizable per client for your needs. The field supports lookups, currency fields, multi select fields, free text, and checkboxes!
- Navigate to a record in Yoga. Single click to open
- Navigate to the invoice lines section on the form
- These invoice lines can be setup to extract directly from the invoice or can be added manually

- Simply input the required information on columns indicated in red for required
- To add additional lines, simply select the + Add Line action on the far right of the field

- To remove lines, simply select All with the top left check box or select specific lines. Select the three horizontal dots by the Invoice Lines label. Select Remove Selected

Profile Setup
Top Right Corner
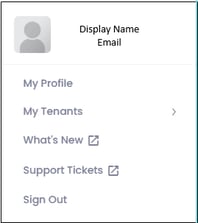
Clicking on your Avatar brings up your display name, email address and three options for you to select from: My Profile, My Tenants, Support Tickets, and Sign Out. Clicking on the tiles to the left of your Avatar does nothing.
My Profile
- Whenever you wish to view or change Personal or Account information, navigate to the Personal Settings page by clicking on the My Profile option. From the Personal Information pane you can update your Avatar and Display Name. This display name will follow you around the system, if you go by a different name other than your legal name, this is the spot to update!
- From the Account Information pane, you have the ability to set a default view (per tenant), default tenant (takes place upon each sign on), allow alternating row colors, default the image pop out window (can do manually from record if preferred), and auto load next document on route.
- Select Save Changes.
My Tenants
- Yoga uses 1 centralized URL for accessing all tenants. Each tenant is seen as a separate environment, and you can change between the PROD and TEST environments by clicking on the My Tenants option and selecting one.
What’s New
- Along with receiving an email biweekly during your SaaS subscription for new feature releases, you can also access all recent Yoga Release Notes, user guides, demos, and more by accessing the Yoga Knowledge Base from this hyperlink.
Support Tickets
- If you are experiencing an issue or requesting an enhancement to your system, you can access the HubSpot Portal by clicking on 'Support Tickets.' Once there, you can create a new ticket or check the status. To learn more about support tickets, Click Here.
Sign Out
- Utilize this to sign out of the system.
Updating your Default View
The Default View is the first page you see when signing into Yoga, so you may wish to update it to match what page you want to see. To update your Default View, follow the steps below:
- Click on your Avatar in the Top Right Corner
- Select the My Profile option – you should be brought to the Personal Settings page
- Navigate to the Account Information tab
- Select a View from the drop-down for your Default View and click Save Changes
- If, for instance, you were to change it to the AP Review view, then the next time you log into Yoga you should see the AP Review view first.
- To see your final Default View changes, you’ll need to log out and log back into Yoga for FSM
Left-hand Vertical Pane
This pane is used to, access Admin pages, as well as navigate to the Capture pages, other Views and various reports
- Docking & Undocking the Pane
- When docked/locked, the stacked arrows (right of the Yoga Logo) will be pointing left—click these to partially hide the pane.
- When partially hidden, the arrows will be pointing right—click these to dock/lock the pane
- Accessing Additional Items:
- Sections like Admin or Views contain expandable menus.
- Click on items with white arrows to reveal additional options.
User Management
If your organization has access to maintain users in the system, below are the following steps to add, activate, inactive and grab an extract of all users in the system. This section will also walk you through how to add User Context if utilizing Invoice Assignments for your team.
- In your Admin pages, select User Management
- Here you will see all users in your organization that currently have access to the system and what group they are assigned to
- To Add a new user, select New User in the top right corner

- Select the lookup next to the Azure User ID field

- In the popup, you can do a generic search in the Search in all fields or in each individual column in the lookup. Change the operators by selecting the equals signs next to the column you want to search in.
- If a user has a green checkmark in the Existing User column, they are already in the system and their current user account should be edited. To add a new user, select a new user from the list

- Select the group they will be affiliated with
- Hit Save and Close
- To inactivate a user, simply select the eye icon next to the users name
- A popup is presented ensuring you want to inactivate the user. A slash will appear through the eye once user is inactivated

- To reactivate a user, simply select the eye icon to reactivate
- A popup is presented ensuring you want to reactivate the user. The slash will be removed from the eye icon once activated

- To edit a users group, simply select the pencil next to the user. In the groups, remove the current group and add the new group the user should be assigned to
- To pull a full list of all users in the system, select Export at the top of the page. This will take a full extract of all users, their statuses, groups assigned to them, and last update information for all users
- For user context for invoice assignments, simply navigate to the User Context Management tab
- Here all current User Context is available. You can filter on any of the columns to see if a context already exists for a user or to make edits
- To create a new context, select New User Context at the top right corner

- In the User dropdown, select the user that you are creating a context for
- Select Existing Context and the context valid for your tenant (usually assigned processor)
- In the value field, input their processor name or ID as shown in your masterdata

- To edit context, simply select the pencil, and edit the value or entity needed updated
- To delete a context, simply select the trash can icon

- To take an extract of the current user context in the system, simply select the Export in the top right hand corner. The extract shows the users email, users full name, context, and context value in the export
Support Tickets
By clicking on the avatar in the top right, you will see Support ticket as an option. Support Ticket feature in Yoga for FSM allows you to easily submit, track, and manage support requests through the HubSpot Support Portal. You can create new tickets, check the status of existing ones, and communicate directly within the system. Below is a breakdown of how to use this feature effectively
Submitting a Support Ticket
You can submit a Support Ticket in two ways:
-
Through the HubSpot Support Portal
- Track the status of your tickets.
- Create new tickets for technical issues or questions.
- Access your tickets directly from Yoga, which links to HubSpot.
-
Via Email (support@rpic.com)
- Subject: Enter the ticket title.
- Body: Provide a detailed explanation with examples/images.
- Automatic Ticket Creation: Emails generate HubSpot tickets and assign them based on the sender's company email.
- Visibility: Tickets appear in Yoga > HubSpot for tracking.
- Communication: Updates and responses are sent via email, and you can reply directly through HubSpot or email.
Accessing HubSpot from Yoga
- First-time login: Create an account when first accessing HubSpot from Yoga.
- Sign-In > Register Account
- Use company email
- Sign-In > Register Account
- Auto-login: Future access will be seamless by clicking the HubSpot Support Ticket icon.
- Sign-in page: If prompted, you’ll be directed to sign in or register.
Tracking & Managing Tickets
Once a ticket is created, you can track it using:
Search & Filter
- Search: Find tickets by Subject or Ticket ID and press Enter.
- View: Filter based on ticket ownership. My tickets, displays tickets created by you.
- Status: Filter current progress of the ticket.
- Ticket ID: Unique reference number.
- Subject: Issue title/description.
- Date Created: Submission timestamp.
- Last Activity: Recent communication or updates.
- Status: Current progress of the ticket.